How to Build a Vertical Herb Garden from a Pallet
Fresh herbs at your fingertips without sacrificing an inch of floor space? That’s exactly what a pallet garden gives you. I still remember when I built my first one—it turned a dull little balcony into a green, fragrant wall of flavour. So, in this guide, I’m going to walk you through it. Step by step. We’ll cover how to pick, prep, and plant your own vertical herb garden using one simple wooden pallet.
Quotables
- A safe, heat-treated (HT) pallet can often be sourced for free from local businesses.
- A single mint plant can easily spread across 2-3 pockets in just one growing season.
- Watering needs can vary, check the top inch of soil every 1-2 days in warm weather.
Key Insights
- Your biggest win will be choosing a safe pallet—skip the chemically treated ones or you’ll regret it.
- Drainage makes or breaks your herbs, so angle those fabric pockets properly.
- Don’t cram in mint unless you want a full-blown takeover. Keep it contained!
- Regular pruning isn’t just tidy—it’s the secret to lush, bushy herbs you’ll actually use.
Choosing and Preparing Your Pallet
Right then. The pallet is the backbone of the whole thing, so you’ve got to get this bit right. Thing is, not all pallets are created equal. You need to look out for the “HT” stamp (that means it’s been heat-treated and is safe), but avoid anything marked “MB” at all costs (that’s methyl bromide, a nasty chemical you don’t want anywhere near your basil). If you’re not sure, check the RHS pallet reuse guidelines before you begin.
I nabbed mine from a friend’s furniture shop. Gave it a proper scrub with soapy water, left it to dry in the sun, and it was good to go. Don’t skip the gloves—splinters in your hands make for a miserable start. And if any planks are loose, give them a quick hammer or screw-down so the whole frame feels sturdy.
Expert Tip: I once used a pallet that looked fine but turned wobbly once loaded with soil. My lesson learned? Give it a good shake test before you start. If it rattles like a dodgy shopping trolley, it’s not the one for you.
Gathering Your Materials and Tools
You don’t need a shed full of power tools for this, just the basics:
- A hammer and nails (galvanised ones so they don’t rust).
- A saw if you need to resize the pallet.
- A staple gun (this will be your new best mate).
- Heavy-duty landscape fabric—the cheap stuff will rip and dump your soil everywhere.
- Sandpaper, gloves, screws, and brackets if you’re wall-mounting.
And for soil? Honestly, this is where you don’t want to skimp. Go for a good-quality potting mix over that bargain-bin compost. It feels like you’re cheating your herbs otherwise, and they’ll thank you for the good stuff. If you’re wondering what blend to use, check this guide to the best soil mix for vertical container gardening—it’ll save you a lot of trial and error.
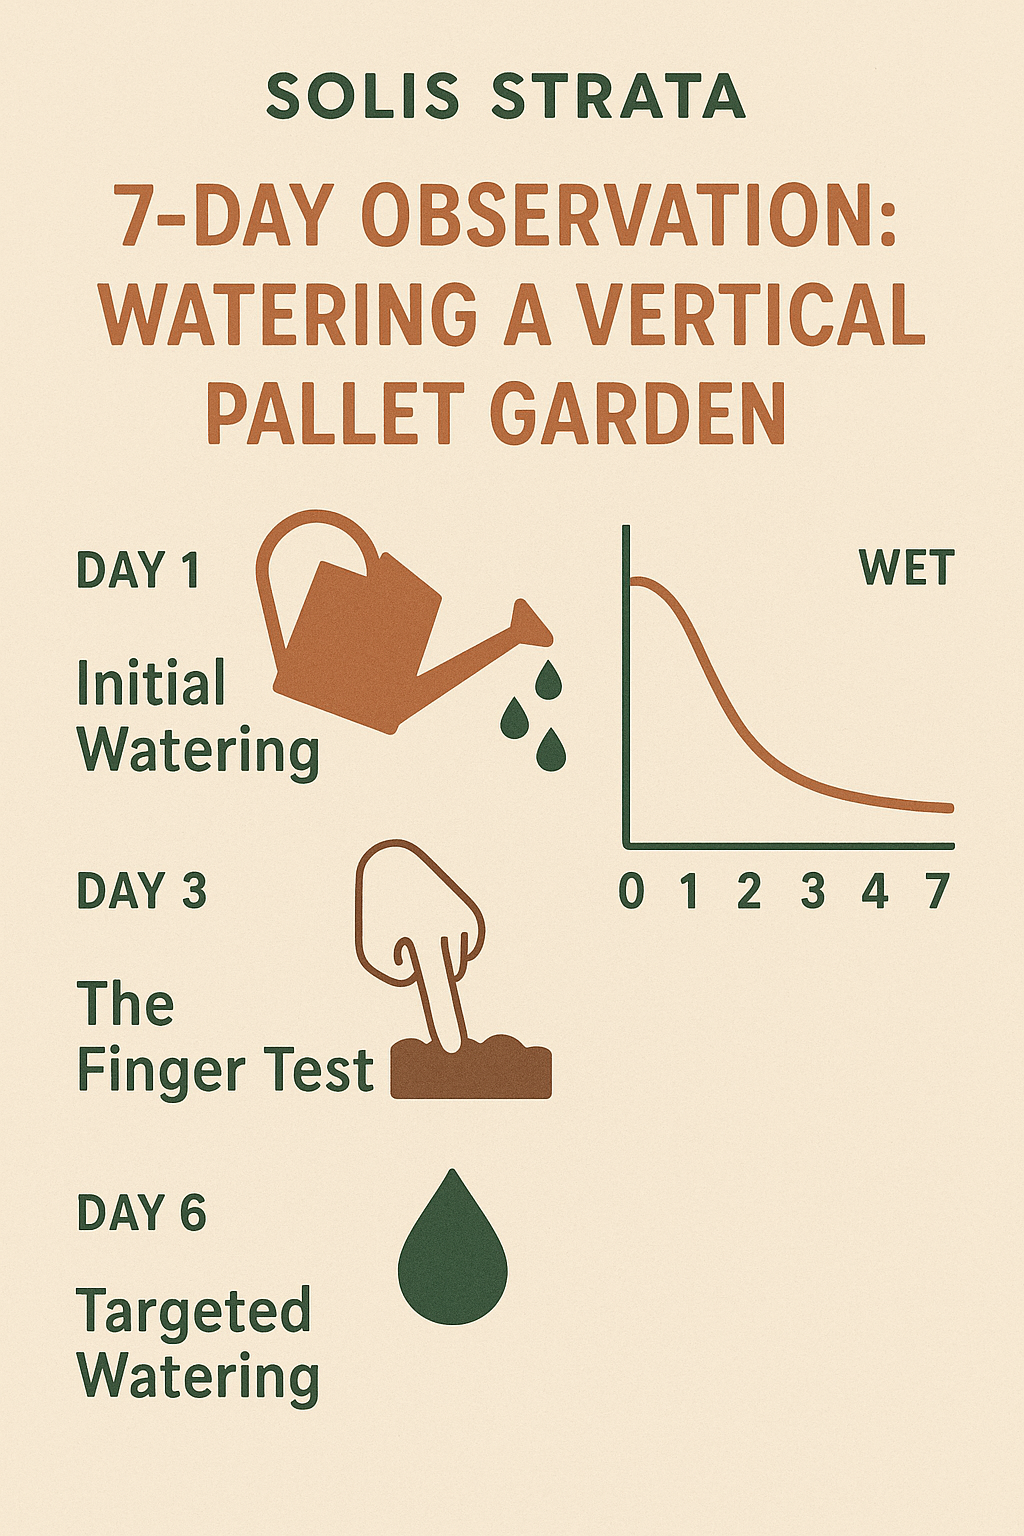
Methods & Evidence — An Observation Plan
The biggest lesson I’ve learned is that every garden has its own rhythm, especially when it comes to watering. To find yours, try this simple 7-day observation plan. It’s not about strict rules, but about learning to ‘read’ your herbs and soil. This is the sort of hands-on science that makes you a better gardener.
- Day 1: Initial Watering. After planting, give all pockets a gentle watering until the soil is damp but not waterlogged. Note how much water you used, perhaps 1-2 litres for a standard pallet.
- Day 2: Visual Check. Don’t water today. Just look. Observe the soil surface in the top, middle, and bottom pockets. The top ones will likely look drier first due to more sun and wind exposure.
- Day 3: The Finger Test. Now for the classic test. Gently push your finger about an inch (2-3 cm) into the soil in different pockets. Is it dry, slightly damp, or properly moist?
- Day 4: Compare & Contrast. Check again. You might find the bottom pockets are still quite damp while the top ones are getting properly dry. This tells you a lot about how water moves through your vertical garden.
- Day 5: Spot the Signs. Look at the herbs themselves. Are any leaves looking a bit droopy or less vibrant, particularly in the upper pockets? This is often the first sign they’re thirsty.
- Day 6: Targeted Watering. Based on your observations, it’s probably time for a drink. You might only need to water the top and middle rows, giving each pocket maybe 150-250 ml.
- Day 7: Review Your Notes. Look back at your observations. You’ve just collected a week’s worth of data on your garden’s specific needs. Now you have a baseline for a watering schedule that actually works.
Illustrative Teaching Table
Here’s an example of what your observation notes might look like. A little logbook like this is a brilliant way to turn gardening into a proper science experiment. Your own readings will vary, of course, depending on sun, wind, and the herbs you’ve chosen.
| Day | Pocket Location | Morning Temp (°C) | Soil Appearance | Finger Test (1=Dry, 5=Wet) | Action Taken |
|---|---|---|---|---|---|
| 1 | All | 15°C | Dark & Damp | 5 | Initial watering (2L) |
| 2 | Top | 16°C | Light brown | 4 | Observation only |
| 3 | Top | 17°C | Light brown, dry patch | 3 | Observation only |
| 3 | Bottom | 17°C | Dark brown | 5 | Observation only |
| 4 | Top | 18°C | Very light, looks dry | 2 | Noted droop on thyme |
| 5 | Middle | 19°C | Slightly damp | 3 | Observation only |
| 6 | Top | 18°C | Very dry | 1 | Watered (200ml) |
| 6 | Middle | 18°C | Dryish | 2 | Watered (200ml) |
| 7 | All | 17°C | Looks balanced | 4 | Reviewed notes |
Creating the Planting Pockets
Right, this is where your pallet starts to look like a proper little vertical allotment. You’re going to cut your landscape fabric into sections. Fold them. Then staple them inside the slats to create these brilliant little hammocks. I find it’s a bit like tucking a duvet into a stubborn cover – needs a bit of wrangling, but you get there.
Don’t be stingy with the staples. You want these pockets tight enough to hold soil but angled slightly downward to let water drain out. Poor drainage leads to soggy basil faster than you can say “pesto fail,” so take a moment to check your angles before filling.
Biology 101: Why Vertical Works
Here’s a fun science nugget for you. Herbs grown vertically get much better air circulation, which seriously reduces mould and fungal problems. Plus, their roots spread out wide and shallow in these pockets. It means they get a much more even sip of water, instead of getting waterlogged at the bottom of one giant pot. Think of it like a class of students sitting in neat rows—everyone gets a fairer share of the teacher’s attention, unlike one big crowd jostling at the front. Clever, eh?
Selecting the Right Herbs
Now for the fun part: what to plant. I always match herbs to their environment. It just makes sense. Rosemary, thyme, and oregano are Mediterranean sun lovers—perfect for a bright south-facing wall. Parsley, mint, and coriander prefer a cooler, slightly shadier spot. If your balcony leans more grey than sunny, have a peek at the ultimate guide to shady balcony gardens for inspiration.
Oh, and a word about mint: unless you want a mint empire, keep it in its own pot. I once tucked some in with chives and, within weeks, the chives were gasping for space while the mint marched through like an invading army. It was a proper faff to sort out.
Planting and Caring for Your Herbs
Time to get your hands dirty. Loosen the roots of each plant gently before tucking them into their new pocket homes. Don’t pack the soil too tightly—give the roots room to breathe. Then give everything a good drink, but for heaven’s sake, don’t drench it. Honestly, overwatering is the number one killer of pallet gardens. A lesson I’ve learned the hard way more than once.
I nearly lost a whole chive collection because I went overboard with the watering can. A long-spout can is brilliant for reaching tucked-away pockets, but if you’ve built a tall pallet frame, you might want to read up on watering tall vertical gardens to save yourself sore arms (and drowning plants).
A half-strength liquid feed every couple of weeks keeps everything thriving. If pests like aphids show up, a squirt of mild soapy water usually does the trick. (And if you’re nervous about sprays, the BBC’s advice on organic pest control is gold.)
Displaying and Maintaining Your Vertical Herb Garden
Pick a spot that gets the right light for your chosen herbs and is easy to reach when you’re mid-cooking. Make sure you secure it properly with brackets if you’re hanging it—nobody wants their parsley crashing onto the patio after a gust of wind.
And prune regularly! I know it can feel harsh, but it’s what keeps your herbs bushy and productive. Honestly, snipping herbs often is like giving them a little pep talk. In colder months, you may need to bring the whole thing inside or cover it up. Gardener’s World has a solid seasonal protection guide if frost is a worry.
Troubleshooting: Common Pallet Garden Problems
- Soil slipping out: Ah, the classic escape artist. It happens. Usually, the fabric’s just too thin. Your best bet is to reinforce it with another layer of the heavy-duty stuff.
- Herbs wilting despite watering: Check the drainage. If water’s pooling at the bottom, the pockets might be too flat. Sound familiar? Try tilting the pallet slightly.
- One herb taking over (usually mint!): Evict it. Relocate it to its own pot before it strangles its neighbours. No mercy.
- Pests galore: I once had an army of whitefly set up camp on my basil. A quick wipe down with a neem oil spray (safe for edibles, but do check GOV.UK pesticide safety advice first) sorted it right out.
If you’re worried about the bigger picture, here’s a handy read on the most common vertical garden problems.
Sources
- Royal Horticultural Society (RHS) – For trusted advice on pallet reuse and general gardening practices.
- GOV.UK – For official guidance on pesticide safety and regulations in the United Kingdom.
- BBC Gardener’s World – For seasonal tips, pest control advice, and plant protection guides.
Disclaimer
Please remember, the observation plan and table provided are for educational purposes only. Your own garden’s results will be unique, influenced by your specific location, weather, and choice of plants. Happy experimenting!
Conclusion
At the end of the day, building a vertical herb garden from a pallet is such a rewarding little project. With a bit of elbow grease, some clever planting, and that little splash of science, you’ll have a living wall of flavour that smells incredible and tastes even better. You’ve got this.
Right, over to you. Get creative, have a go, and please share your own pallet garden creations with us! I’m always dead chuffed to see what you come up with.
FAQs
How do I stop soil falling out of my pallet pockets?
I’ve been there! The trick is to use strong landscape fabric and double-layer it if you’re worried. Also, stapling at an angle creates a hammock effect that holds soil better. If you want a full walkthrough, here’s my guide on stopping soil escaping from planters.
Can I grow vegetables as well as herbs in a pallet garden?
Yes, but pick smaller crops. Salad leaves, radishes, or even dwarf tomatoes will work. If you’re keen, have a look at my honest take on growing tomatoes in pots before trying them vertically.
How often should I water my vertical herb garden?
It depends on the weather and your herbs, but little and often works best. On hot summer days I water mine daily; in cooler months every few days is fine. Always test the soil first with your finger—if it feels dry an inch down, it’s time.
Do pallet herb gardens survive winter?
Some herbs like rosemary and thyme are hardy, but softer ones like basil will sulk in the cold. I either bring mine indoors near a sunny window or use fleece covers. Honestly, treating it like tucking the herbs in for bed makes it less of a chore.
Can I use any pallet I find for free?
Tempting, I know, but don’t! Some pallets are chemically treated. Always check the stamp and avoid anything marked MB. Stick with HT, and when in doubt, skip it. A safe pallet is worth the effort.
How To Build a Pallet Herb Garden
Step 1: Pick and prep your pallet.
Choose one that’s stamped HT (heat treated), scrub it down, dry it, and fix any wobbly planks. Gloves on—splinters ruin the fun.
Step 2: Gather your gear.
Grab a staple gun, heavy-duty fabric, good soil, and some brackets if you’ll mount it. Think quality, not quantity—you’ll use these bits again.
Step 3: Build your planting pockets.
Cut and staple fabric into snug hammocks between slats. Angle them slightly for drainage. Test with a handful of soil before planting.
Step 4: Choose and plant your herbs.
Match the right plants to your light conditions. Tuck them in gently, water lightly, and space them so nobody gets crowded out.
Step 5: Care and enjoy.
Water little and often, prune to keep herbs lush, and keep an eye out for pests. Soon you’ll be snipping basil for pizza straight off your balcony wall.
Bob is a UK-based teacher who brings his passion for simplifying complex topics to the world of small-space and container gardening. All his advice comes from years of hands-on experience, helping UK gardeners get the most out of their balconies and patios. You can read his full story on the About the Author page.