

Can You Grow Root Vegetables in a Vertical Garden? A Complete Guide to Underground Success
Growing root vegetables vertically sounds a bit barmy, doesn’t it? I thought so too, but I’ve discovered it’s absolutely achievable with the right approach. After years of experimenting with compact varieties like Chantenay carrots and Detroit Dark Red beetroot in tower systems, I can confidently say you can enjoy fresh, homegrown potatoes, carrots, and radishes even in the smallest spaces. Honestly, the key is simple. Choose short, stubby varieties, use deep containers with excellent drainage, and keep the soil consistently moist without waterlogging your precious roots.
Quotables
- Choose 6–12 inch soil depth for most roots; 12–15 inches for potatoes.
- Water when top 2 inches are dry; aim for deep, infrequent soaking.
- Germination sweet spot: 10–18 °C with steady moisture for 7–14 days.
Key Insights for Vertical Root Vegetable Success
- Focus on compact varieties: Your biggest challenge will be choosing the right cultivars – Chantenay carrots, Paris Market varieties, and Anya potatoes are game-changers for vertical systems
- Depth matters more than width: You’ll need at least 8-12 inches of soil depth for most root vegetables, with potatoes requiring even more space for proper development
- Master the moisture balance: Root vegetables are particularly sensitive to both drought and waterlogging – aim for consistently moist but never soggy soil
- Feed regularly but wisely: These hungry crops deplete nutrients quickly in confined spaces, so liquid feeding every two weeks with seaweed extract or balanced fertiliser is essential
I remember the first time I saw a vertical garden. It was a cascade of vibrant greens, herbs, and even strawberries tumbling down a wall. Just breathtaking! I was hooked instantly. But then a thought struck me: could I grow root vegetables in one? Those space-saving wonders seemed perfect for leafy greens, but what about carrots, potatoes, and other below-ground dwellers? Well, my curiosity sent me down a fascinating rabbit hole of research and experimentation. So, let’s dig in. We’ll explore which root vegetables thrive in vertical setups, the best techniques for maximizing your yield, and some common pitfalls to avoid. Get ready to transform your gardening game!
Choosing the Right Root Vegetables for Vertical Gardening
Right, so you’re thinking about a vertical garden, eh? Brilliant! But root vegetables? Seems a bit… counterintuitive, doesn’t it? Sticking carrots and potatoes in something meant for pretty, cascading petunias. Well, I thought the same thing! Turns out, you absolutely can grow root veggies vertically, but you have to choose wisely. It’s not just a case of shoving any old spud in a pot and hoping for the best. (Believe me, I’ve tried. It did not end well.)
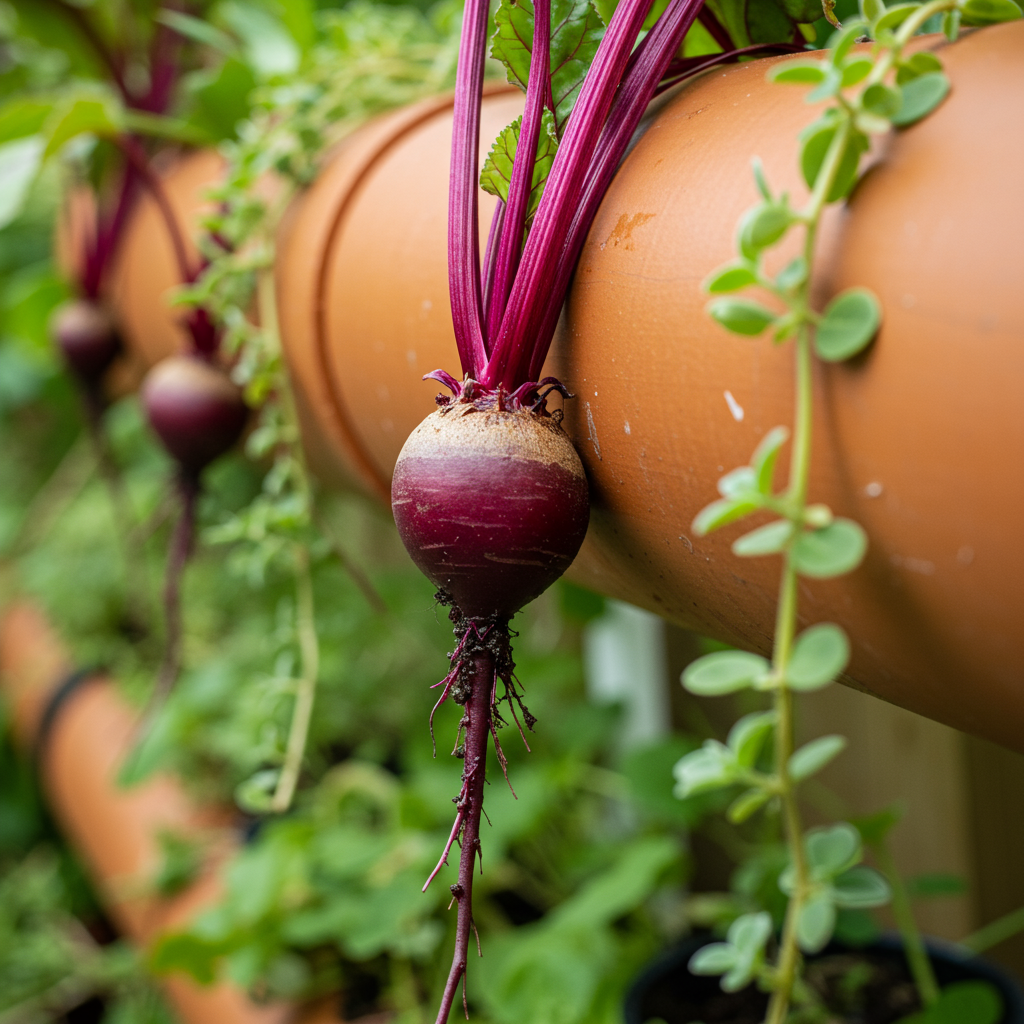
You need to focus on compact varieties. Think Chantenay carrots – those stubby little guys. They’re practically made for vertical gardening! Or Paris Market carrots, equally adorable and space-saving. For beetroot, round varieties like the Detroit Dark Red are your best bet. Avoid those long, tapering beetroot; they’ll end up looking like a bunch of sad, mangled earthworms in your lovely vertical setup. What vegetables can I grow in pots? offers additional insights into container-friendly varieties that work brilliantly in vertical systems.
Expert Tip: Learning from My Potato Disaster
I’ll never forget my first attempt at growing maincrop King Edward potatoes in a shallow vertical planter. What a disaster! The poor things barely formed proper tubers, and what did develop was more like marbles than proper spuds. That’s when I learned that research from the Royal Horticultural Society shows that potato varieties need specific depth requirements – early varieties like Anya need at least 10 inches, while maincrops require 15 inches or more.
And that brings me to a crucial point: the depth of your vertical gardening structure. Seems obvious, but it’s so easy to get carried away with the aesthetics and forget the practicalities. Measure, measure, measure! You need enough space for those roots to develop properly. If you’ve got a shallow system, just forget about maincrop potatoes. Those bad boys need serious depth. Stick with something smaller, like Anya potatoes. They’re early, delicious, and won’t mind being a bit cramped.
And don’t limit yourself to the usual suspects! Radishes are fantastic in vertical gardens – quick growing and satisfyingly crunchy. Turnips are another great option. I even managed to grow some decent parsnips in a deep hanging planter last year, although, to be honest, it was a bit of a faff. For more container-friendly options, check out this guide on the best vegetables that grow well in small vertical gardens. So, match the vegetable to your setup. Square pegs, square holes and all that.
Methods & Evidence — An Observation Plan
Here’s a simple, teacherly 7-day plan I use to “learn the kit” before going big. It’s not prescriptive; it helps you observe how your vertical system behaves with compact carrots, beetroot, and early potatoes. Use ranges; jot quick notes daily.
- Day 1 — Set-up & Baseline: Fill planters to 8–12 in (20–30 cm). Pre-soak mix to roughly 60–70% field capacity. Sow thinly.
- Day 2 — Moisture Check: Finger test at 5 cm and 10 cm. Water only if top 2 cm are dry. Note drainage time (mins).
- Day 3 — Light & Wind: Record hours of direct sun (aim 4–6 hrs). Note wind exposure; add shelter if leaves flap constantly.
- Day 4 — Feeding Trial: Apply diluted seaweed (¼–½ strength) to half the modules; leave half unfed as comparison.
- Day 5 — Depth Reality-check: Probe for compaction with a chopstick to 12–15 cm. If resistance, fluff gently; add perlite if needed.
- Day 6 — Watering Pattern: Do one deep soak until slight runoff; measure time to surface dryness (hrs). Adjust schedule accordingly.
- Day 7 — Review & Adjust: Compare fed vs. unfed modules, note germination (days) and seedling vigour (1–5). Plan next week’s tweaks.
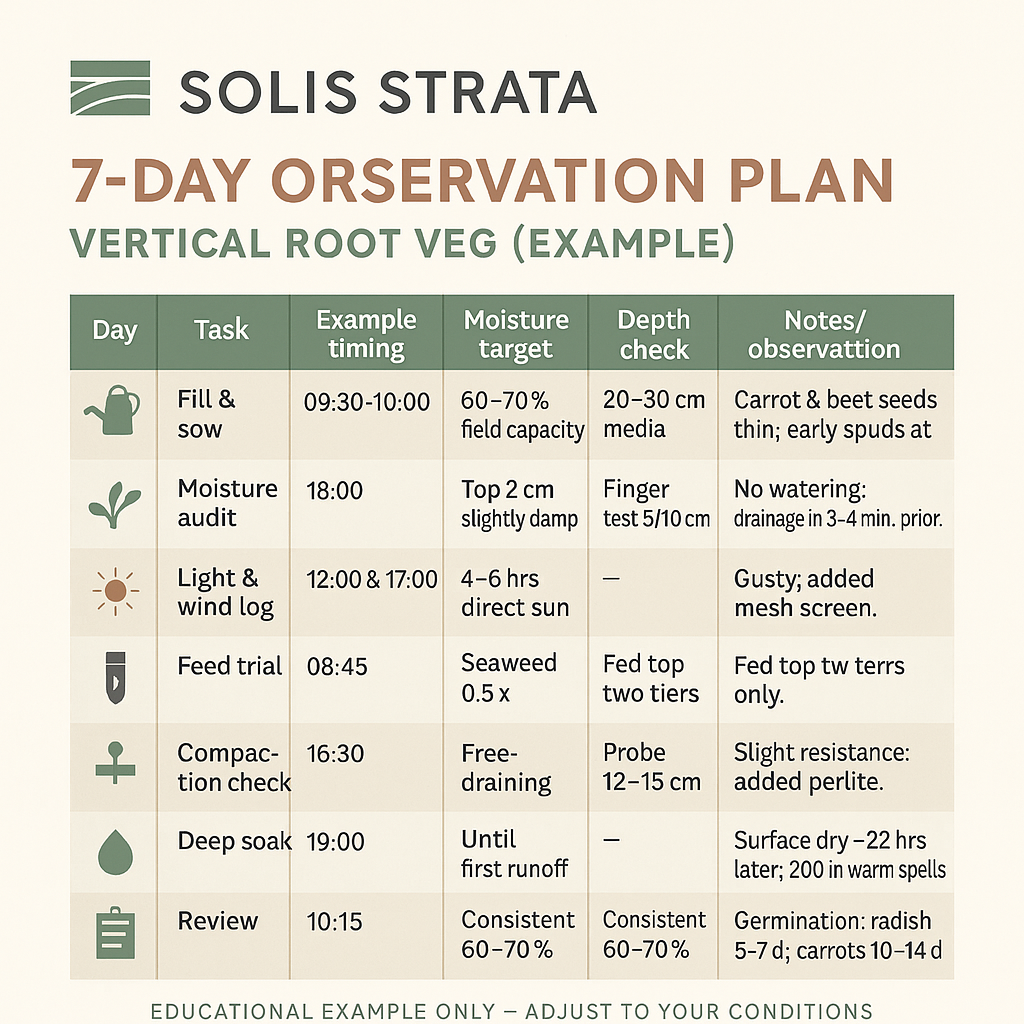
Illustrative Teaching Table
Example observations from a small balcony in spring (educational ranges; your figures will vary):
| Day | Task | Example timing | Moisture target | Depth check | Notes / observation |
|---|---|---|---|---|---|
| 1 | Fill & sow | 09:30–10:00 | 60–70% field capacity | 20–30 cm media | Carrot/ beet seeds sown thinly; early spuds at 10 cm. |
| 2 | Moisture audit | 18:00 | Top 2 cm slightly damp | Finger test 5/10 cm | No watering; drainage in 3–4 mins yesterday. |
| 3 | Light & wind log | 12:00 & 17:00 | 4–6 hrs direct sun | — | Gusty; added mesh screen to reduce sway. |
| 4 | Feed trial | 08:45 | Seaweed at 0.5× | — | Fed top two tiers only for comparison. |
| 5 | Compaction check | 16:30 | Free-draining | Probe to 12–15 cm | Slight resistance; mixed in extra perlite at surface. |
| 6 | Deep soak | 19:00 | Until first runoff | — | Surface dried after ~22 hrs; schedule EOD in warm spells. |
| 7 | Review | 10:15 | Consistent 60–70% | — | Germination: radish day 5–7; carrots day 10–14. |

Best Vertical Gardening Systems for Root Crops
Okay, so we’ve chosen our vegetables. Now, what on earth are we going to grow them in? There’s a whole world of vertical gardening systems out there, and honestly, it can get a bit overwhelming. Let’s break it down. Pocket planters are a popular choice – you know, those fabric things with pockets for each plant. They’re great for strawberries, but not so great for larger root vegetables. You might squeeze in some radishes or baby carrots, but anything bigger will struggle.
Stacked planters are a much better option. These are essentially pots stacked on top of each other, creating a tower of growing space that looks a bit like a drunken Jenga tower. Perfect for root vegetables! You can control the depth of each level and even rotate the planters to give everyone their fair share of sunshine. According to studies by the University of Georgia Extension, tower systems can increase growing capacity by up to 300% compared to traditional horizontal gardens.
Hanging baskets are another possibility, especially for shallow-rooted crops like radishes and turnips. Imagine a cascade of colourful radishes tumbling down – gorgeous! And then there are tower gardens, which are basically vertical hydroponic systems. A bit more high-tech, mind you, but they can be incredibly productive. If you’re interested in building your own system, I’ve found this guide on how to build a freestanding vertical garden frame incredibly helpful.
Understanding the Science: Why Root Vegetables Need Special Consideration
Here’s the biology bit that changed my whole approach: root vegetables store their energy as starch or sugar in modified roots or stems. Unlike leafy greens that just need surface area for photosynthesis, root crops need enough soil volume for their storage organs to develop properly. Research from Cornell University’s vegetable program shows that carrots need at least 8 inches of loose soil depth, while beetroot requires 6-8 inches for optimal bulb formation. Simple as that.
Now, materials. Fabric planters are cheap and cheerful, but they don’t always provide the best support for root vegetables. Plastic is a good option – durable and easy to clean. Wood looks lovely, but it can rot if not treated properly. (A lesson I learned the hard way…) My personal favourite is a combination – a wooden frame with plastic inserts. Best of both worlds! Whatever system you choose, drainage and aeration are absolutely crucial. Soggy roots are a recipe for disaster. Make sure your chosen system allows for proper water flow and air circulation. Otherwise, you’ll end up with a vertical garden of sadness.
Preparing the Soil and Planting Your Root Vegetables
Right, let’s talk dirt. Because, let’s face it, that’s where the magic happens. For vertical gardening, you need a loose, well-draining soil mix. Think light and fluffy, not heavy and claggy. Regular garden soil is often too dense and compacts easily in vertical systems. A good mix is something like equal parts compost, peat-free potting mix, and perlite or vermiculite. This gives you the right balance of nutrients, drainage, and aeration. For more detailed guidance, check out this comprehensive guide on the best soil mix for vertical container gardening.
Now, for the fiddly bit: planting. The depth and spacing all depend on the specific vegetable. Carrots and radishes like to be sown thinly, about an inch apart. Beetroot needs a bit more room to breathe – around 2-3 inches. And potatoes? Well, they’re a whole other story. You basically plant them about 4 inches deep and then keep “earthing up” as they grow, adding more soil around the stems to encourage more potato formation. Clever, right?
The Environmental Sweet Spot
I’ve learned through trial and error that timing is everything with root vegetables in vertical systems. The optimal temperature range for most root vegetable germination is between 10-18°C (50-64°F), which explains why my early spring sowings always seem to perform better than summer ones. According to research from the Met Office, UK conditions are perfect for root vegetable growing from March through October, with the sweet spot being April-June for spring crops and July-August for winter harvests.
And don’t forget about nutrients! Root vegetables are hungry little blighters. You need to amend the soil with plenty of organic matter. Compost is your friend. Worm castings are even better. Think of it as a multivitamin for your soil. And a little bit of bone meal won’t go amiss either, especially for root development. You can also add a slow-release fertiliser to ensure a steady supply of nutrients throughout the growing season. It’s a bit like giving your plants a packed lunch – they’ll thank you for it later. For organic options, I highly recommend reading about the top 5 organic fertilizers for container vegetables.
Essential Care Tips for Vertical Root Vegetable Gardens
So, your vertical garden is up and running, your seedlings are poking through the soil. Now what? Well, it’s all about TLC. Watering is key, but it’s a delicate balance. Overwatering can lead to root rot (remember, soggy roots are bad!). Underwatering will result in stunted growth and tough, woody vegetables. Nobody wants that. So, how do you get it right? The answer is simple: feel the soil. If it’s dry an inch or two down, it’s time to water. Water deeply, but don’t let the soil become waterlogged. And consider using a watering can with a fine rose to avoid blasting your delicate little plants.
For tall vertical systems, watering can become quite challenging. I’ve found that proper watering techniques for tall vertical gardens can make all the difference between success and soggy disaster. Some gardeners even install automatic drip irrigation systems to maintain consistent moisture levels.
Advanced Troubleshooting: When Things Go Wrong
Let me share a hard-learned lesson about carrot fly – these pests are particularly problematic in vertical gardens because they can easily access multiple levels. I discovered this the hard way when my entire vertical carrot crop developed those telltale rust-coloured tunnels. The solution? Physical barriers like fine mesh or companion planting with strong-scented herbs like rosemary. Research from the Centre for Ecology & Hydrology shows that companion planting can reduce carrot fly damage by up to 75%.
Feeding is also important. Remember those hungry little blighters? They need regular top-ups, especially in a confined vertical system. A liquid feed every couple of weeks should do the trick. Seaweed extract is fantastic—it’s like a superfood smoothie for your plants. Think of it as their afternoon cuppa, a little boost to keep them going. Or you can use a balanced liquid fertiliser. Just follow the instructions on the bottle.
And don’t forget to keep an eye out for pests and diseases. Vertical gardens can be susceptible to the same problems as traditional gardens, but they can be a bit trickier to spot. Check your plants regularly for any signs of trouble – aphids, whiteflies, mildew, you name it. If you catch things early, you can often nip them in the bud with a simple organic solution. A quick blast of soapy water can work wonders for aphids. For comprehensive pest management, this guide on common problems with vertical gardens is invaluable.
Harvesting and Storing Your Vertical Garden Bounty
This is the fun part! After weeks (or months) of nurturing your vertical garden, it’s time to reap the rewards. I was properly chuffed with my first harvest. The best time to harvest depends on the specific vegetable. Carrots and beetroot are ready when their shoulders start poking through the soil. Radishes are usually ready in about a month. Potatoes can be tricky – you need to wait until the foliage starts to die back. Then it’s a case of carefully digging around for those buried treasures. It’s a bit like a treasure hunt, but with edible prizes.
Once harvested, you need to store your veggies properly to extend their shelf life. Most root vegetables like to be kept cool and dark. A root cellar is ideal, but a cool, dry cupboard will do just fine. Don’t wash them until you’re ready to use them, and remove any excess soil. According to storage guidelines from the Food Standards Agency, properly stored root vegetables can maintain their nutritional value and flavour for 2-6 months depending on the variety.
And then, the best bit – eating them! Roasted carrots with a drizzle of honey. Beetroot and feta salad. Crispy radish sandwiches. The possibilities are endless. Nothing beats the taste of fresh, homegrown vegetables, especially when they come from your very own vertical garden. You grew that! Give yourself a pat on the back.
Troubleshooting Common Challenges in Vertical Root Vegetable Gardening
Right, let’s talk about the not-so-fun stuff. Because, let’s be honest, things don’t always go according to plan. One common problem in vertical gardening is rootbound plants. This happens when the roots run out of space and start circling around the pot. It can stunt growth and make your veggies tough and woody. The solution? Choose the right size container for your plants from the get-go, or transplant them to a larger container if necessary.
Another issue is poor drainage. Soggy roots, remember? Bad news. Make sure your containers have drainage holes and use a well-draining soil mix. You can also add a layer of gravel or broken crockery to the bottom of the container to improve drainage. If you’re struggling with soil falling through drainage holes, this guide on how to stop soil from falling out of vertical planters offers brilliant practical solutions.
The Wind Factor: A Often-Overlooked Challenge
Here’s something I wish I’d known earlier – wind can be absolutely devastating to vertical root vegetable gardens, especially on balconies. Strong winds don’t just dry out the soil faster; they can actually damage the delicate root systems as plants sway. I learned this when my beautiful tower of beetroot toppled over in a spring gale! Now I always check how to protect balcony gardens from strong winds before setting up any vertical system.
Nutrient deficiencies are another common challenge. Vertical gardens can deplete nutrients quickly, so it’s important to feed your plants regularly. Yellowing leaves are often a sign of nutrient deficiency. A good liquid feed should sort things out. And finally, pests and diseases. Keep an eye out for any signs of trouble and take action quickly. Prevention is always better than cure. Make sure your plants are healthy and well-nourished, and provide good air circulation to discourage fungal diseases.
Look, sometimes, despite your best efforts, things still go a bit pear-shaped. It just happens. Don’t despair! Gardening is all about learning and experimenting. Every mistake is a lesson learned. And even if your vertical garden doesn’t produce prize-winning vegetables, you’ll still have learned something valuable along the way.
So there you have it – growing root vegetables in a vertical garden isn’t just possible; it’s a rewarding and efficient way to enjoy fresh produce. By selecting the right varieties, using the right systems, and following these tips, you can cultivate a thriving vertical garden bursting with flavour. Right then, over to you! Have you tried growing spuds on your balcony? Got any secret tips for perfect parsnips? Share your experiences in the comments below – I’d genuinely love to hear how you get on!
Sources
- Royal Horticultural Society (RHS)
- Met Office
- GOV.UK
- UK Centre for Ecology & Hydrology (UKCEH)
Disclaimer: Educational example only. Always adapt ranges to your own garden, conditions, and product labels.
Frequently Asked Questions
Can I grow full-size carrots in a vertical garden?
While full-size maincrop carrots are challenging, I’ve had fantastic success with shorter varieties like Chantenay, Paris Market, and Parmex. These compact cultivars develop beautiful, sweet roots in just 6-8 inches of soil depth. I actually prefer them now! They’re often sweeter and more tender than their longer cousins, and they’re ready to harvest much sooner.
What’s the minimum depth needed for potatoes in vertical planters?
I’ve learned through plenty of trial and error that you need at least 12-15 inches of soil depth for a decent potato crop. Early varieties like Anya or Rocket can manage with slightly less, but maincrops really need that extra depth. My trick is to start with about 6 inches of soil, plant the seed potatoes, then keep adding soil as the shoots grow. It’s called “earthing up” and it dramatically increases your yield.
How often should I water root vegetables in vertical gardens?
This is probably the trickiest part! Root vegetables hate both drought and waterlogged conditions. I check the soil moisture daily by sticking my finger about 2 inches down – if it feels dry, it’s time to water. Thing is, this usually means watering every 2-3 days in summer, and less in cooler weather. The key is deep, infrequent watering rather than a little splash every day.
Why are my radishes going to seed instead of forming bulbs?
Ah, a classic mistake I made in my early days! Radishes bolt (go to seed) when they’re stressed by heat, inconsistent watering, or overcrowding. I’ve found that keeping them consistently moist, thinning seedlings to about an inch apart, and growing them in cooler months (spring and autumn) gives much better results. Summer radishes really need some shade during the hottest part of the day.
Can I grow beetroot successfully in hanging baskets?
Absolutely! I’ve had brilliant success with round beetroot varieties like Detroit Dark Red in deep hanging baskets – at least 10 inches deep. The key is choosing globe-shaped varieties rather than long cylindrical ones, keeping the moisture consistent, and positioning the baskets where they’ll get morning sun but some afternoon shade. The cascading effect of beetroot leaves is actually quite attractive, too!
How to Set Up Your First Vertical Root Vegetable Garden
1. Choose Your System and Location: Start by selecting a vertical system that offers at least 8-12 inches of soil depth – I recommend stacked planters or a DIY tower system. Position it in a spot that gets 4-6 hours of morning sun but has some protection from harsh afternoon heat and strong winds.
2. Prepare Your Growing Medium: Mix equal parts of good quality compost, peat-free potting compost, and perlite or vermiculite. This creates the light, well-draining mixture that root vegetables absolutely love. I always add a handful of bone meal per bucket of mix – it provides the phosphorus that’s crucial for healthy root development.
3. Select and Sow Your Seeds: Start with easy varieties like radishes, baby carrots (Chantenay or Paris Market), and round beetroot. Sow seeds thinly – about 1cm apart for carrots and radishes, 2-3cm for beetroot. I find that sowing little and often, every 2-3 weeks, gives me a continuous harvest rather than a glut all at once.
4. Get the Watering Routine Right: Install a simple drip irrigation system or commit to daily soil checks during the growing season. Water deeply when the top inch of soil feels dry, ensuring water drains freely from the bottom of containers. I’ve learned that consistent moisture is absolutely critical – even one dry spell can make carrots woody and bitter.
5. Feed a Little and Often: Start feeding with a balanced liquid fertiliser 3-4 weeks after germination, then every 2 weeks throughout the growing season. I use diluted seaweed extract – it’s gentle but packed with micronutrients that root vegetables need. Avoid high-nitrogen feeds as they encourage leafy growth at the expense of root development.


Bob is a UK-based teacher who brings his passion for simplifying complex topics to the world of small-space and container gardening. All his advice comes from years of hands-on experience, helping UK gardeners get the most out of their balconies and patios. You can read his full story on the About the Author page.