How to Build a Freestanding Vertical Garden Frame for Your Patio
Ever looked at a bare wall or fence and thought, “That could really use a bit of life”? I know I have. I stared at the empty patch on my patio for months before finally deciding to give vertical gardening a go. Honestly, it was one of the best little projects I’ve ever tackled. Vertical gardens are brilliant. They don’t just save space – they completely transform dull corners into lush, living backdrops. In this guide, I’ll walk you through how to build your own freestanding vertical garden frame. We’ll chat about materials, tools, design ideas, plant choices, and a few handy tips I wish I’d known before I started. Right, let’s roll up our sleeves and get stuck in!
Quotables
- Allow 10–15 kg per square metre when wet and planted.
- Plan for 1–2 cross-braces per 1–1.5 m of height.
- Water use can drop 20–40% with simple drip lines.
Key Insights
- The first big decision is your material – wood, metal, or PVC. Honestly, getting this right from the start saves a world of pain later on.
- Don’t skimp on the ‘boring’ tools. A clamp and a level might feel like overkill, but they’re the difference between a masterpiece and a wobbly disaster.
- Choosing your plants is the fun part, but let your garden’s sun exposure lead the way. A sun-loving plant in a shady spot is a recipe for a sad-looking display.
- A little clever planning goes a long way. Thinking about things like drip irrigation or extra cross-bracing now means you’ll have far less faff down the line.
Choosing the Right Materials for Your Frame
Right then, frames. Where do we even begin? There’s a whole smorgasbord of materials out there, each with its own personality. You’ve got your classic wood, your sturdy metal, and your lightweight PVC. Let’s break it down, shall we?
Wood is just lovely, isn’t it? It gives that rustic, homely vibe and is generally pretty easy to work with. The downside? It needs regular TLC. You have to treat it with a good quality preserver or it’ll rot faster than a banana forgotten at the bottom of a school bag. The Royal Horticultural Society has some brilliant advice on caring for wood in the garden that I always refer back to. That said, reclaimed timber or offcuts from a local yard can be an affordable and eco-friendly win. I’ve even nabbed brilliant bits from skips (legally, of course – don’t go nicking someone’s fence panels!).
Then there’s metal. It’s strong, sleek, and practically bombproof if you go for the right type. Aluminium and galvanised steel are both great options, though your wallet might wince a bit at the price. The big enemy here? Rust. If you’re planning on a long-lasting frame, you’ll need to stay on top of protection and touch-ups.
Finally, there’s PVC. Budget-friendly, weather-resistant, and light enough that you won’t risk a hernia carrying it around. The only issue is, well, it can look a bit plasticky. A bit like wearing wellies to a wedding – practical, but not the height of garden chic. A clever trick is painting or wrapping it to soften the look, or combining PVC with timber trims so it blends in better.
👉 If you’re still undecided, think about how much maintenance you’re realistically up for. Are you the type who enjoys tinkering and touching up, or would you rather “build it and forget it”? There’s no shame in either answer!
The best soil mix for vertical container gardening will also influence your material choice – heavier, moisture-retentive soils will put more strain on a wooden frame over time than a lighter mix would.
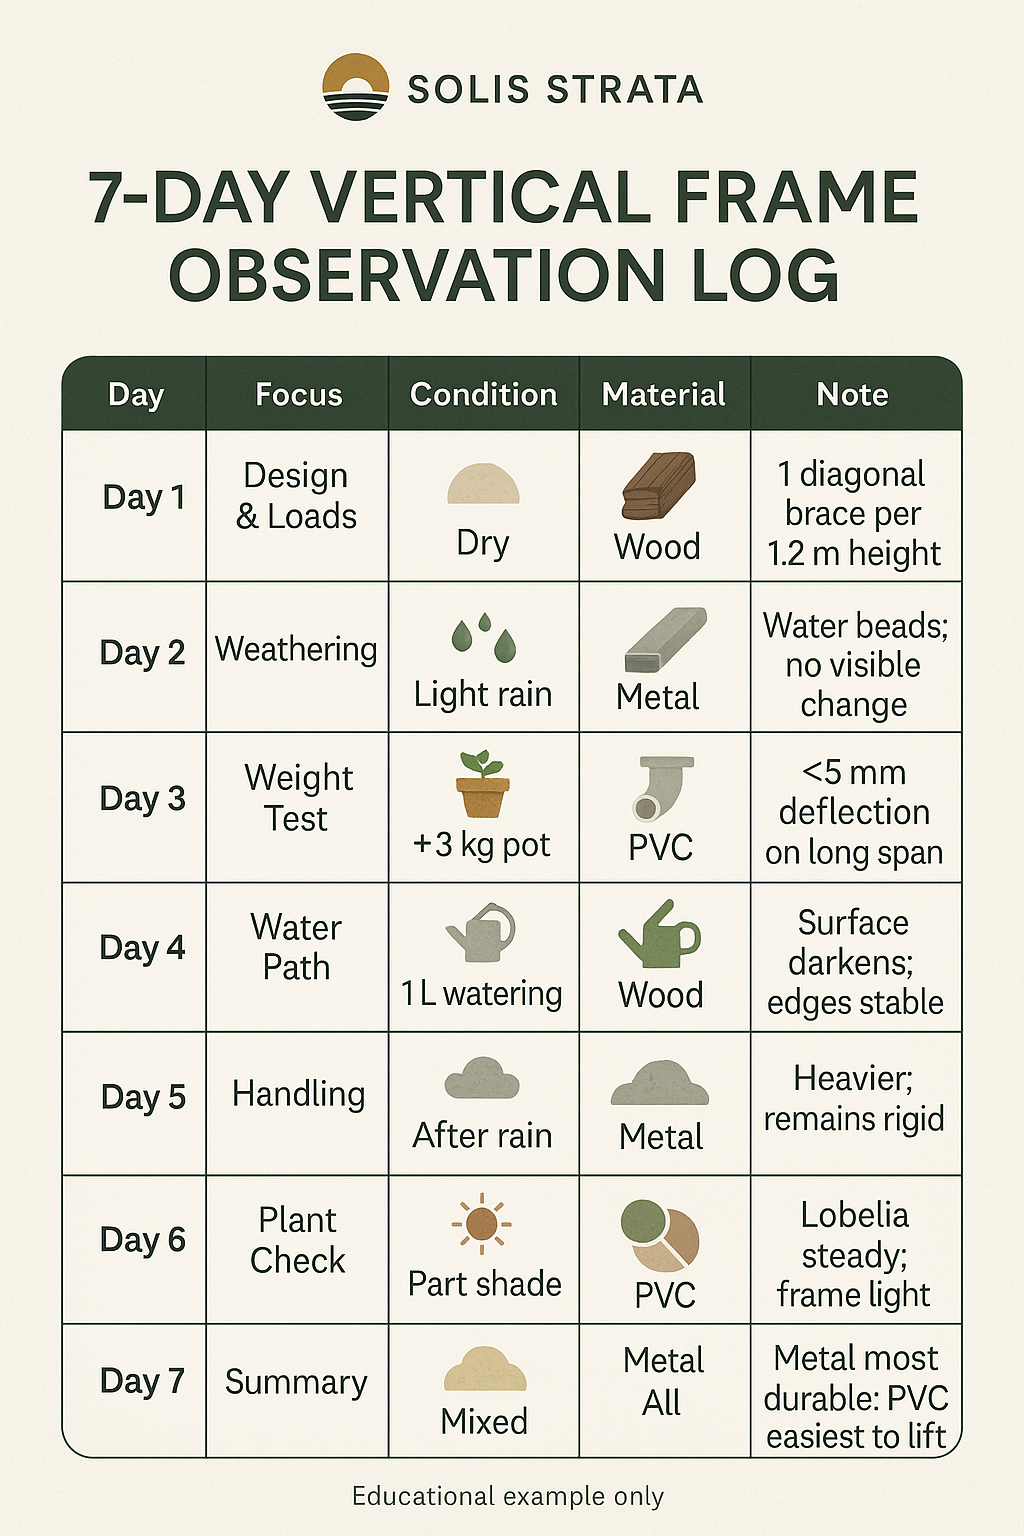
Methods & Evidence — An Observation Plan
Here’s a friendly 7-day observation plan to help you compare materials and setups at home. Use it as a journal, not a test.
- Day 1: Sketch the frame and note likely loads (wet compost, wind, fixings). Estimate total weight range (10–25 kg/m²).
- Day 2: Place small samples of wood/metal/PVC outdoors. Record weather and any surface change.
- Day 3: Hang a 2–4 kg test weight on each sample. Note flex, twist, or creep.
- Day 4: Water a trial pocket or pot (0.5–1 L). Check drainage run-off and drip paths.
- Day 5: Move each test rig. Log ease of handling and stability after rainfall.
- Day 6: Observe plant response (e.g., basil vs. fern) in sun/part-shade/shade positions.
- Day 7: Summarise findings: which material felt strongest, easiest to maintain, and nicest to look at?
Illustrative Teaching Table
| Day | Focus | Condition | Material | Example Observation |
|---|---|---|---|---|
| 1 | Design & Loads | Dry | Wood | Needs 1 diagonal brace per 1.2 m height |
| 2 | Weathering | Light rain | Metal | Beads water; no visible change |
| 3 | Weight Test | +3 kg pot | PVC | Slight deflection at long span (<5 mm) |
| 4 | Water Path | 1 L watering | Wood | Surface darkens; no swelling at edges |
| 5 | Handling | After rain | Metal | Feels heavier but remains rigid |
| 6 | Plant Check | Part shade | PVC | Lobelia steady; minimal frame movement |
| 7 | Summary | Mixed | All | Metal most durable; PVC easiest to lift |
Essential Tools and Equipment
Now for the fun bit – tools! Gather round, my DIY padawans. For this project, you’ll need the basics:
- A saw (hand or power – I admit, my power saw and I have had our share of domestic disputes).
- A drill and the right bits for your chosen material.
- Weather-resistant screws (honestly, galvanised ones are worth the few extra quid).
- A measuring tape (don’t try eyeballing it – I promise, you’ll regret it).
- A spirit level. Yes, you will notice if it’s wonky. Every single time you look at it.
And for heaven’s sake, safety glasses. I once ignored mine and spent an evening flushing a wood chip out of my eye with lukewarm tea – not an experience I’d recommend. Gloves aren’t a bad shout either, especially if you’re working with treated timber.
While not strictly essential, a clamp, a sander, and a square can make the whole job smoother. Think of them as your loyal sidekicks in the DIY superhero movie that is your Saturday afternoon.
Designing Your Vertical Garden Frame
Okay, before you even think about picking up that saw, you need a plan. Just like you wouldn’t bake a cake without a recipe (well, unless you enjoy burnt offerings), you shouldn’t start building blind.
Start with size. Have you got a wide wall that could take a grand, towering garden? Or are you in a smaller space where a compact rectangle is more realistic? Don’t forget to account for pot depth and the eventual weight of wet soil and mature plants – vertical gardens often need sturdier frames than you first expect. It’s amazing how much force a good British gust of wind can exert on a structure like this, as any seasoned gardener will tell you.
Shape is another fun one. Rectangular is classic, but I’ve seen triangular frames that look like mini green pyramids – and they’re surprisingly stable! Sketch your ideas, scribble dimensions, and – the golden rule – measure twice, cut once. Although, between us, I’ve managed to measure wrong twice and cut wrong once, so don’t beat yourself up if it happens.
Thinking about how much sun does my vertical garden need? is a brilliant question to ask yourself at this stage. The design will change dramatically depending on whether you’re dealing with blazing midday rays or a shady corner.
Step-by-Step Construction Guide
Alright, deep breaths. This is where the magic happens. Because your design will be unique, I can’t hand you a cookie-cutter blueprint, but here’s the general flow of things:
- Cut your frame pieces according to your design. Double-check your lengths before sawing, unless you fancy an unintentional abstract sculpture.
- Assemble the outer frame on a flat surface first – think of it as building the skeleton before adding the muscle.
- Secure with screws, making sure the joins are snug and tight. A wobbly joint now will become a major headache later.
- Check with your level at every stage. Seriously. It’s so much easier to fix a slight lean now than when the whole thing is built. Don’t end up with a Leaning Tower of Lettuce.
- Add cross-bracing if it’s a tall or wide design. Trust me, without it, a good gust of wind might turn your hard work into a pile of sticks. It’s the difference between a solid structure and a drunken Jenga tower.
- Reinforce the corners with metal brackets if it’s a large frame, because they bear most of the load. Better safe than sorry!
Take your time here. Rushing just means more time fixing mistakes later. And if your frame is large, rope in a friend. Some things are just easier with four hands and someone to hold the other end steady.
Selecting the Perfect Plants for Your Vertical Garden
The frame is done – hurrah! Now comes the part that makes it come alive: the plants. This is where your personality can really shine through.
Herbs are a brilliant starter. Things like basil, thyme, and parsley not only look lush but also make you feel like a TV chef when you snip fresh sprigs mid-cooking. Trailing plants like ivy, trailing lobelia, or nasturtiums can soften the edges and create a natural “waterfall” of greenery. If you’re forgetful with watering (guilty as charged), succulents or hardy ferns are far more forgiving. There’s a fantastic range of plants suitable for these living walls that can give you loads of ideas.
The big thing is to match plants to your conditions. A sunny balcony wall will be perfect for Mediterranean herbs and flowering climbers. A shaded fence, on the other hand, might be better for ferns, hostas, or even strawberries that don’t mind a cooler nook.
For inspiration, have a look at what vegetables grow best in a vertical garden?. You’ll be surprised at just how productive a small wall can be.
Maintaining and Caring for Your Vertical Garden
So you’ve built it, filled it, and you’re admiring your masterpiece. But don’t put your feet up just yet – maintenance is the secret to keeping it looking gorgeous.
Watering can be a bit of a faff. Plants at the top tend to dry out quicker, while the bottom row sometimes gets soggy. A drip irrigation kit (I swear by mine, it’s a game-changer) keeps everything even. Or, if you’re old-school, just water slowly from the top and let gravity help you out.
Fertilising is like topping up your plants’ energy drink. A balanced liquid feed every couple of weeks during the growing season keeps them in top form. Don’t overdo it, though – too much and you’ll end up with lush leaves but no flowers or fruit.
Pests are inevitable, I’m afraid. Aphids once had a massive party on my mint – I spotted them when the leaves started curling and looking sticky. The fix? A strong spray of water and a bit of vigilance. According to horticultural experts, regularly checking your plants is the best defence. Slugs and snails are another headache. A beer trap works wonders, although it feels a bit like luring them into a pub crawl they won’t survive.
If you’re keen to get more tips, my guide to 10 common problems with vertical gardens covers most of the hiccups I’ve hit over the years.
Sources
- Royal Horticultural Society (RHS)
- GOV.UK
- Gardeners’ World
- University Extension Services (e.g., Integrated Pest Management)
Disclaimer
Educational example only. Use these ranges and observations as guidance for learning, not prescriptive instructions.
Conclusion
Building your own freestanding vertical garden frame is one of those projects that feels a bit daunting at first but ends up being incredibly rewarding. You start with a bare wall, some planks of wood, and a plan – and you end with a lush, living feature that’s entirely yours. It’s part DIY, part gardening, and a whole lot of fun.
So, give it a go. Sketch your design, grab your tools, and see where your imagination takes you. And when you’ve built your own, I’d love to hear about it. Share your photos and stories – trust me, every frame ends up telling a little bit of its builder’s personality.
FAQs
How tall should a freestanding vertical garden be?
I’d say start modest, especially for your first one. My own first frame was around 5 feet tall, and that was plenty to handle. Anything taller can get top-heavy, catch the wind, and become a real pain to water evenly. If you really want height, make absolutely sure you build in solid cross-bracing.
Can I move a vertical garden once it’s built?
Technically, yes – but prepare for a proper workout! Once it’s filled with damp soil and plants, it can get incredibly heavy. I learned this the hard way. I always, always position mine exactly where I want it before a single plant goes in. Saves the backache!
What plants shouldn’t I grow in a vertical frame?
Oh, definitely avoid heavy root crops like carrots, potatoes, and parsnips. They are a nightmare in these setups because they need deep, unobstructed soil and just don’t play nicely with vertical containers. Stick with lighter, shallow-rooted plants for a happy garden.
Do vertical gardens need special soil?
Not “special,” but good drainage is absolutely key. I always use a good quality compost mix designed for containers. It’s much lighter than ordinary garden soil, which can get compacted, but it’s still packed with nutrients. The right soil makes all the difference.
How do I keep the frame looking good over time?
A little annual check-up does the trick. For my wooden frames, I give them a quick sand and a fresh coat of stain or preserver every spring. For metal, I keep an eye out for any rust spots and touch them up with paint. And PVC? A quick wipe down with soapy water usually brings it back to life.
How-To: Building Your Frame Like a Pro
Step 1: Gather and prep your materials
Right, first things first. Pick your wood, metal, or PVC and cut all your pieces to size based on your sketch. I find it really helps to lay everything out on the ground so you can see the “skeleton” of your frame before you even pick up the drill. It’s a great way to spot any glaring mistakes before they’re screwed in place!
Step 2: Build the main outer frame
This is your foundation, so don’t rush it. Assemble the main rectangle—the sides and top and bottom pieces. Use a square to make sure your corners are true 90-degree angles. Honestly, taking your time here makes every other step ten times easier.
Step 3: Add supports and cross-bracing
Now for the important bit that stops the whole thing from collapsing in the first strong wind! Add your internal supports and any diagonal cross-bracing. Think of them as the seatbelts for your plants. They might not look exciting, but they provide all the strength.
Step 4: Position and secure your frame
Before you get carried away with planting, get the frame exactly where you want it to live. Make sure it’s level and secure against any wobbling. Trust me, once it’s loaded with soil and water, moving it becomes a two-person job that you really don’t want to do.
Step 5: Plant up and enjoy!
This is the best bit. Add your soil mix, tuck in your chosen plants, and give them a good water. Then, step back and admire your handiwork. It’s amazing how quickly a bare frame becomes a green, thriving, living wall that you built yourself. Well done, you!
Bob is a UK-based teacher who brings his passion for simplifying complex topics to the world of small-space and container gardening. All his advice comes from years of hands-on experience, helping UK gardeners get the most out of their balconies and patios. You can read his full story on the About the Author page.