How to Start a Thriving Balcony Garden: A Beginner’s UK Guide to Beating the Wind and Weather
Snippet: Starting a balcony garden in the UK is all about learning to work with what you’ve got—wind, shade, weight limits, and our barmy weather. By getting to know your balcony, choosing sturdy pots, using the right compost, and picking plants that are actually suited to your conditions, you can turn even the windiest little space into a lush, thriving green retreat.
Quotables (example figures)
Example figures — educational, not prescriptive.
- A medium terracotta pot (~30 cm) may need 500–750 ml of water on a warm, windy day.
- One large, wet pot (~40 cm diameter) can easily weigh over 20–25 kg; always check weight limits.
- Just 3–5 hours of direct sun is the ‘partial shade’ sweet spot for most balcony plants.
Right, let’s have a chat. You have a balcony. A little patch of outdoor space that’s all yours. You have visions of sitting out there with a morning cuppa, surrounded by lush green leaves and a splash of colour. Maybe you dream of snipping your own fresh herbs for your cooking. It’s a lovely thought, isn’t it?
But then, the doubt creeps in. “My balcony’s a wind tunnel,” you think. “I get no sun.” Or, “I kill every plant I touch.” I hear you. I’ve been there. My first attempt at a balcony garden looked glorious for about a week, until an unexpected gust of wind made my beautiful petunias look like they’d been through a paper shredder. It was a sad, expensive lesson.
This guide is built on that lesson, and many others. This isn’t just another list of plants. This is a simple, step-by-step plan designed specifically for UK beginners. We’re going to tackle the real challenges of our weather, our small spaces, and our windy city balconies head-on. Forget overwhelm; by the end of this, you’ll have a foolproof plan to create your own thriving, blissful escape.
First, a Quick Reality Check: The 5-Minute Balcony Audit
Before you even think about buying a pot, I need you to play detective for a day. Honestly, these five minutes of observation will save you more money and heartache than anything else. This is the secret to working with your balcony, not against it.
Sunlight: Are You a ‘Sun-Trap’ or a ‘Shade-Cave’?
The tag on a plant that says “full sun” is not lying. To figure out what you have, try the “Teacup Test”. Place a teacup (or any object) on your balcony rail or floor. Check it a few times during the day.
- Full, direct sun for 6+ hours? You’ve got a Sun-Trap. Great for Mediterranean herbs, lavender, and geraniums, but you’ll need to be on top of watering.
- Sun for 3–5 hours? You’ve got “partial shade.” This is the jackpot! Most plants will be very happy here.
- Little to no direct sun at all? You’re in a Shade-Cave. Don’t despair! This is perfect for lush, leafy plants like ferns, hostas, and ivy that would get scorched elsewhere. For deeper planting ideas, check the ultimate guide to shady balcony gardens.
Wind: Is it a Breeze or a Bully?
Wind is the silent killer on a balcony. It dries plants out and can snap stems. To gauge your wind level, hang a simple t-shirt on your railing for an afternoon.
- Gently fluttering? You’re fine. Most plants will be happy.
- Whipping about horizontally? You have a windy spot. This is critical information. It means we’ll be choosing tougher plants and heavier pots. For more survival strategies, see how to protect your balcony garden from strong winds.
Weight: A Reassuring Word on Load-Bearing
Let’s clear this up: you are very, very unlikely to have your balcony fall off. Modern balconies are built to high standards (UK building regulations ensure safety). However, it’s wise to be mindful. The heaviest things in a balcony garden are big ceramic pots filled with soaking wet compost.
The common-sense rule is to start small. Don’t go out and buy ten gigantic terracotta pots. Begin with a few medium-sized pots and see how you go. Place heavier items closer to the wall of the house, over the structural supports, rather than right at the outer edge of the railing.
Rules: The Renter’s Checklist
If you rent, a quick check of your tenancy agreement now can save a headache later. Look for clauses about “affixing items to walls” or “alterations to the exterior.” Most landlords are perfectly happy with freestanding pots, but they might not want you drilling into the brickwork to install a trellis.
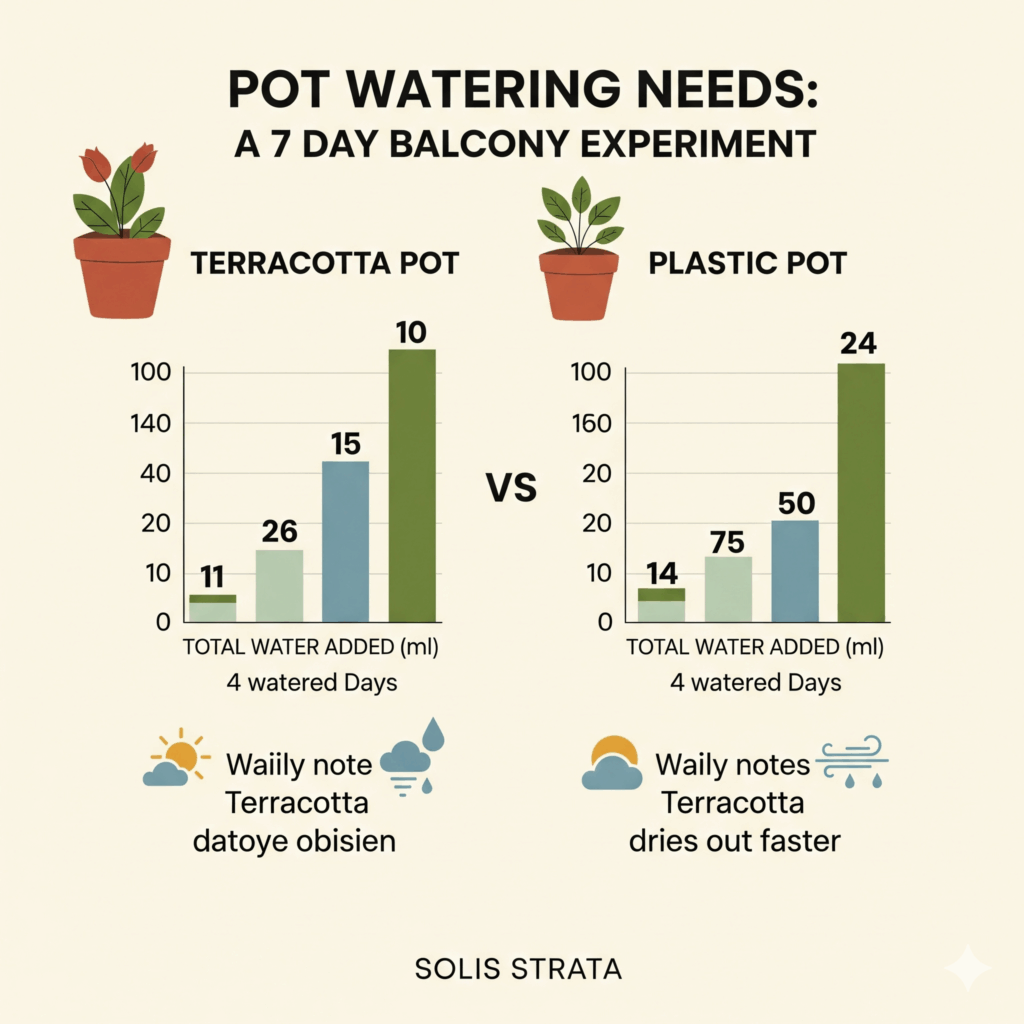
Methods & Evidence — Example Plan
This plan teaches you how to observe your balcony’s unique conditions to understand your plants’ real-world watering needs, moving beyond guesswork.
- When & Where: A week in late spring (e.g., May) on a typical UK balcony receiving partial sun.
- Setup: One terracotta pot and one recycled plastic pot (both ~30 cm diameter), filled with the same peat-free compost mix [2].
- Instruments: A simple soil moisture probe (with a 1-10 scale), a measuring jug (ml), and a notebook or spreadsheet.
- Protocol: For 7 days, check the soil moisture in both pots at 08:00 and 18:00. If the reading is below 6 (starting to dry), add water in ~250 ml increments until the probe reads ~7–8 (moist, not waterlogged) [1]. Record the total water added to each pot daily. Note the day’s weather (e.g., sunny, windy, overcast).
- Photos to Include: 1) A close-up of the soil moisture probe in a pot. 2) A side-by-side shot of the two different pot types being tested.
This is a plan with illustrative values — collect your own readings before acting.
7-Day Teaching Table (illustrative data, do not copy)
| Day | Pot Type | Moisture AM (1-10) | Moisture PM (1-10) | Water Added (ml) | Notes |
|---|---|---|---|---|---|
| 1 | Terracotta | 8 | 4 | 500 | Overcast, breezy |
| 1 | Plastic | 8 | 6 | 250 | Retained moisture well |
| 2 | Terracotta | 8 | 3 | 750 | Sunny, warm day |
| 2 | Plastic | 8 | 5 | 500 | Dried out more today |
| 3 | Terracotta | 8 | 5 | 500 | Cooler, cloudy |
| 3 | Plastic | 8 | 7 | 0 | Still moist from yesterday |
| 4 | Terracotta | 8 | 3 | 750 | Very windy and sunny |
| 4 | Plastic | 8 | 5 | 500 | Wind had a big effect |
Step 1: Choosing Your Pots (Your Plants’ Homes)
In balcony gardening, your pot is more than just a container; it’s an anchor and a water reservoir.
- For Windy Balconies: Go for substance. Terracotta, stone, or thick wooden planters are excellent. Their sheer weight will keep them put. Look for squat, low-profile shapes that are wider than they are tall – they’re much harder to tip over.
- For Weight-Conscious or Renter Balconies: If you’re concerned about weight or can’t have super-heavy containers, opt for high-quality recycled plastic or fabric grow bags. The trick here is to group them together in a corner or against the wall. A cluster of five lighter pots is far more stable than one on its own.
The Non-Negotiable: Whatever you choose, it must have drainage holes at the bottom. Without them, water will pool and rot your plants’ roots (Royal Horticultural Society guide backs this up). If a beautiful pot has no holes, you can (carefully) drill some yourself.
Step 2: The Foundation – Getting the Right Compost
Please, do not be tempted to just dig up some soil from a nearby park. It’s often heavy, compacted, full of weed seeds, and not suited for pot life (DEFRA peat-free compost guide).
Getting the soil right is easy and I have a simple recipe for you. You need two things:
- One bag of good quality, peat-free multi-purpose compost. This is the main body of your soil, full of nutrients.
- One bag of perlite. These look like little bits of white polystyrene, but they’re actually volcanic glass. Adding a few good handfuls of this into your compost keeps it light and airy, preventing it from turning into a solid brick and allowing roots to breathe.
For Sun-Trap balconies, I highly recommend adding a small scoop of water-retaining granules. They act like tiny sponges, soaking up water and releasing it slowly, which can save your plants on a hot day.
Pro Tip for Flat Dwellers: Repotting can be messy. Buy a cheap plastic tarp or even just use an old bedsheet. Lay it down on your balcony, do all your messy work on top of it, and then you can just fold it up and funnel all the spilled soil back into the bag. No mess, no stress.
Step 3: Choosing Your Plants (The Fun Bit!)
Right, this is where your detective work pays off. We are going to choose plants that will actively thrive in your specific spot.
You’ll find more planting inspiration in year-round colour: best flowers for UK balconies and the unkillable balcony herb garden.
The “Wind-Proof” Starter Pack
- Geraniums (Pelargoniums): Surprisingly wind-tolerant, colourful, and reliable.
- Erigeron karvinskianus (Mexican Fleabane): A delicate daisy that thrives even in cracks, unfazed by wind.
- Ornamental Grasses (Stipa tenuissima ‘Ponytails’): Designed to move with wind, adding graceful movement.
- Sempervivums (Houseleeks): Hardy succulents that store water and withstand drying winds.
The “Shade-Cave” Survivors
- Hostas: Architectural foliage plants in stunning shades.
- Ferns: Compact, hardy, and instantly lush.
- Heucheras: Colourful foliage from deep purple to lime green.
The “Grow Your Own” Easy Wins
- Herbs: Rosemary, Thyme, Mint (always pot separately), and Chives.
- Salad Leaves: Cut-and-come-again lettuces.
- Spring Onions: Even regrow supermarket trimmings in soil.
For a broader list, see what vegetables can I grow in pots?.
Step 4: Planting & Watering Like a Pro
- Cover the drainage hole with a shard of terracotta or stones.
- Fill the pot two-thirds with compost mix.
- Tease plant roots gently before placing.
- Fill around with compost, leaving 2–3cm at the top.
- Water thoroughly until it drains out the bottom.
Watering Tips:
- Use the “finger test” instead of a rigid schedule.
- Always place saucers under pots to avoid water spilling onto neighbours.
- Water slowly and evenly to let soil absorb moisture (RHS watering advice).
For automation on busy weeks, consider an automatic drip irrigation kit.
Step 5: Creating Your Oasis – Privacy and Layout

Your balcony garden can also be a brilliant privacy screen.
- For Homeowners: Install a trellis with climbers like Jasmine or Clematis.
- For Renters: Use freestanding troughs with built-in trellises or vertical tension rods.
- Think Vertically: Railing planters and shelving make use of air space.
If squirrels or birds become pests, read protecting your paradise: stop squirrels.
Conclusion: Your Balcony Journey Has Just Begun
There you have it. A plan. Not just a list of things to do, but a way of thinking about your little patch of sky.
The secret to a thriving balcony garden in the UK isn’t about having “green fingers.” It’s about being a good detective at the start, choosing plants that will be happy in your specific spot, and not being afraid to get it wrong.
I promise you, some plants will die. My basil always dies. It’s part of the process. But some will live, and they will flourish. And one sunny morning, you’ll step out there, take a deep breath, and realise your bare balcony has become a blissful, living escape. And it will be brilliant.
Want the printable ‘UK Balcony Planting Calendar’ cheat sheet? It tells you exactly what to plant and when for a gorgeous balcony all year round. Tap below to get it via email—it’s my go-to guide.
Now, go and have a proper look at that balcony. Your journey starts today.
Sources
Royal Horticultural Society (RHS)
— Comprehensive guidance on container gardening, plant choices, and watering best practices.
GOV.UK / DEFRA
— Information on UK building regulations and environmental policies, including the transition to peat-free compost.
British Standards Institution (BSI)
— Oversees quality protocols for products, including the PAS 100 standard for composted materials.
Disclaimer
Educational example only. Conditions vary; test small and observe before scaling. Check local rules/lease.
FAQ
How much weight can my UK balcony safely hold?
Most modern balconies are built to withstand heavy loads in line with UK safety standards. Still, spread weight evenly and avoid clustering heavy pots at the railing edge.
What’s the easiest edible plant to start with?
Mint is nearly indestructible and thrives in pots. Just remember to keep it contained or it will spread aggressively.
How do I stop my balcony from looking messy?
Group plants in clusters of three to five, stick to a colour palette, and use vertical shelving to reduce clutter.
What’s the best way to keep plants alive while I’m on holiday?
Self-watering globes or an automatic drip irrigation kit can cover short absences. For longer trips, ask a neighbour to water.
Can I attract pollinators even on a high-rise balcony?
Yes! Compact flowers like lavender, nasturtiums, and herbs such as thyme are excellent for bees. For full details, check a bee-friendly balcony garden.
HowTo: Start a Balcony Garden in the UK (A 7-Step Plan)
- Audit Your Balcony
Before buying anything, note your balcony’s sun hours, wind level, and check for any rules in your tenancy agreement. This initial check is the most crucial step. - Choose Sturdy Pots
Select pots appropriate for your conditions. Use heavy terracotta or stone for windy spots to prevent tipping. For renters or weight-conscious spaces, group lighter recycled plastic pots together for stability. Ensure all pots have drainage holes. - Mix Your Compost Properly
Create a light, airy soil mix. Blend a good quality, peat-free multi-purpose compost with a few handfuls of perlite. For very sunny spots, add water-retaining granules to help the soil stay moist. - Pick Plants Suited to Your Space
Use your audit results to choose plants that will thrive. Select sun-lovers for bright spots, shade-tolerant species for darker corners, and tough, windproof varieties for exposed balconies. - Plant Correctly
When potting, cover the drainage hole with a stone, fill the pot two-thirds with your compost mix, gently tease the plant’s roots, place it in the pot, and fill the remaining space with compost, leaving a small gap at the top. - Water Wisely
After planting, water thoroughly until it drains from the bottom. Moving forward, use the “finger test”—only water when the top inch of soil feels dry. Always use saucers to prevent dripping on neighbours below. - Maximise Your Layout
Make the most of a small space by thinking vertically. Use railing planters, shelves, or a trellis to create privacy and expand your growing area without cluttering the floor.
Bob is a UK-based teacher who brings his passion for simplifying complex topics to the world of small-space and container gardening. All his advice comes from years of hands-on experience, helping UK gardeners get the most out of their balconies and patios. You can read his full story on the About the Author page.