Light Requirements for Indoor Vertical Gardens
Right then! Let’s demystify grow lights. It can all seem a bit like mad science, can’t it? But I promise you, by the end of our little chat, you’ll understand exactly what your leafy friends are craving. We’ll turn that daunting tech-speak into simple, practical advice you can use today. Let’s get those greens glowing! best grow lights for vertical gardens
- Your plants need the right colours of light (red & blue), not just any bright bulb.
- I always say that light intensity is like portion size—it has to be right for the plant.
- Don’t forget to give them a break! Most plants need 6-8 hours of darkness to rest.
- A simple plug-in timer is honestly the most important bit of kit you can buy.
- Positioning your lights correctly is just as crucial as the type of light you choose.
Quotables
- Modern LED grow lights can be up to 60% more energy-efficient than older HID lighting systems.
- Providing the optimal light spectrum can increase indoor crop yields by over 25% in some leafy greens.
- Blue light (400-500nm) is proven to drive the initial vegetative and leaf growth stages.
Understanding Light Basics
Before we dive into the details, let’s get our heads around the four key ingredients of light that our plants care about. Think of it as learning the basics of cooking before trying a fancy recipe. Once you get these, everything else clicks into place.
The Light Spectrum (A Plant’s Diet)
Imagine trying to live on a diet of only crisps. You’d survive, but you wouldn’t be very healthy, would you? Plants are the same with light. They can’t just use any old light; they need a balanced meal of different colours, or wavelengths. The two most important dishes on the menu are blue light and red light. Blue light is brilliant for encouraging strong leaf and stem growth—think of it as the protein that builds them up. Red light, on the other hand, is what encourages plants to flower and eventually produce fruit. A good “full-spectrum” LED gives them a healthy buffet of everything they need, a bit like our own five-a-day.
Light Intensity (Portion Size)
Light intensity is simply how much light is actually reaching your plant’s leaves. We measure this in a few ways, but the term you’ll see most often with good quality lights is PPFD (Photosynthetic Photon Flux Density). Don’t let the name scare you! It’s just a precise way of saying ‘how many useful light particles are landing on a specific spot every second’. A delicate herb like basil needs a smaller portion of light than a sun-worshipping tomato plant. Getting the intensity right is key to avoiding weak, spindly plants or, at the other end, scorched leaves. According to research from horticultural experts, matching PPFD to the plant’s specific growth stage is critical for success.
Light Duration (Bedtime)
This is one of the easiest bits to get right but also one of the most common mistakes I see. Plants need to sleep! They have complex processes that happen in the dark, so running your lights 24/7 is a recipe for stressed-out, unhappy plants. This daily light period is called the photoperiod. Most leafy greens and herbs are perfectly happy with 14-16 hours of light, followed by a solid 8-10 hours of darkness. The easiest way to manage this? A simple mechanical timer. It costs less than a tenner and will do more for your plants’ health than almost anything else. It’s a non-negotiable bit of kit for your indoor vertical garden system.
Colour Temperature (The Vibe)
Now, this one is actually more for us humans than for the plants. Colour temperature is measured in Kelvin (K) and it tells you what the light will look like to your eyes. A low Kelvin number (around 2700K) gives off a warm, yellowish-orange glow, like an old incandescent bulb. A high number (6500K+) gives off a very cool, blue-white light that feels a bit clinical. For a living space, I find a light around 4000-5000K is the sweet spot—it looks like clean, natural daylight and keeps both you and your plants happy.
Methods & Evidence — A Light Setup Observation Plan
Here’s a little 7-day plan I’ve put together to help you get your lighting dialled in perfectly. It’s all about observing and making small tweaks. This approach helps you learn what your specific plants need in your unique space.
- Day 1 (Monday): Install your lights at the manufacturer’s recommended height. Set your timer for 14 hours. Let it run.
- Day 2 (Tuesday): Check the leaves. Are the top ones looking a bit pale or washed out? If so, raise the light by an inch or two.
- Day 3 (Wednesday): Look at the lower parts of the garden. Are the plants stretching or looking thin? If so, your light might be too high. Consider lowering it slightly.
- Day 4 (Thursday): Check for heat. Carefully place the back of your hand under the light at leaf level. If it feels uncomfortably warm, the light is too close.
- Day 5 (Friday): Observe the overall growth. You should start to see happy, vibrant new growth appearing. This is a sign you’re on the right track.
- Day 6 (Saturday): Make one small adjustment if needed—either height or perhaps increase the duration to 15 hours if you’re growing something particularly light-hungry.
- Day 7 (Sunday): Relax and admire your work! You’ve established a baseline and can now tweak with confidence as your plants grow.
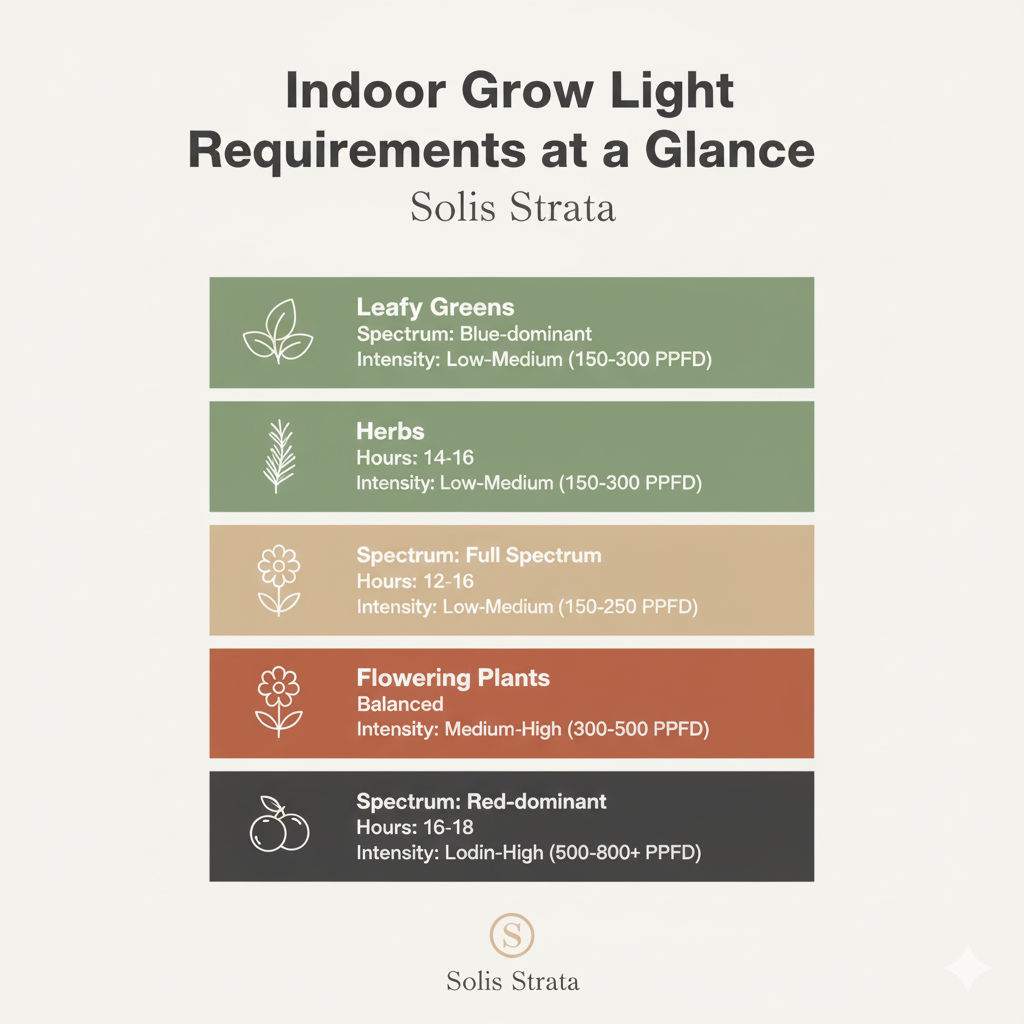
Illustrative Teaching Table
| Plant Type | Spectrum Focus | Daily Light Hours | Intensity (PPFD) | My Pro Tip |
|---|---|---|---|---|
| Leafy Greens | Blue-dominant | 14-16 hours | 150-300 | Rotate trays for even growth |
| Herbs | Full Spectrum | 12-16 hours | 150-250 | Pinch back tops to prevent stretching |
| Flowering | Balanced Spectrum | 12-14 hours | 300-500 | Introduce red light to trigger blooms |
| Fruiting | Red-dominant | 16-18 hours | 500-800+ | Ensure good air circulation |
Requirements by Plant Type
Right, let’s talk specifics. Different plants have different appetites for light, and tailoring your setup to what you want to grow is the secret to a truly lush vertical garden.
Leafy Greens (Lettuce, Spinach, Kale)
These are the sprinters of the indoor garden world. They want to grow big leaves, and they want to do it fast. To help them, you need to give them plenty of that blue light we talked about. They aren’t too fussy and will do brilliantly under a standard full-spectrum LED light. I find they are happiest with about 14-16 hours of light per day. If you’re serious about growing leafy greens indoors, a good quality light is the best investment you’ll make.
Herbs (Basil, Mint, Parsley)
Most common kitchen herbs are fantastic candidates for vertical gardens. They generally have slightly lower light requirements than leafy greens. A good full-spectrum light for 12-16 hours a day is perfect. One tip I’ve learned the hard way is that herbs like basil can ‘bolt’ (start to flower) if the light is too intense or the ‘day’ is too long, so keep an eye on them!
Flowering Plants (Edible Flowers, Strawberries)
If you want flowers or fruit, you need to pay more attention to the red end of the spectrum. This is the light that signals to the plant, “Okay, time to reproduce!” Many high-end grow lights have separate switches or dimmers for blue and red light, allowing you to give them a balanced diet during growth and then crank up the red light when you want to encourage flowering. Strawberries, for example, require a high light intensity and a long day to produce plentiful fruit.
Fruiting Plants (Tomatoes, Peppers)
Now we’re in the big leagues. Fruiting plants like dwarf tomatoes and peppers are the hungriest of all. They need high-intensity light for 16-18 hours a day, with a strong emphasis on red light to support the development of fruit after flowering. Insufficient light is the number one reason people fail with these indoors. As studies from university horticulture departments confirm, light intensity directly correlates with fruit yield and quality.
Calculating Your Needs
Don’t worry, the maths here is very simple. It’s all about making sure you have enough light to cover your entire growing area evenly. Think of it like painting a wall with a spray can—you need to stand back the right distance to get even coverage without any thin patches.
First, measure the square footage of your growing area. If your vertical garden is 2 feet wide and 1 foot deep, you have 2 square feet to cover. Most grow light manufacturers provide a PPFD map or a recommended coverage area for their lights at different hanging heights. For example, a light might cover a 2’x2′ area at a height of 18 inches. Your goal is to choose a light (or multiple lights) that covers your whole garden with the intensity your plants need. A common mistake is buying one powerful light and hanging it high up, which often leaves the corners and lower levels in shadow. Sometimes, several smaller lights provide much more even coverage.
Common Mistakes & Troubleshooting
Alright, let’s sort out a few common wobbles. We’ve all been there, so don’t panic if you see something’s amiss. It’s usually a simple fix.
- Symptom: Tall, spindly plants (legginess).
Diagnosis: This is a classic sign of not enough light. The plant is literally stretching to find more.
Solution: Lower your light closer to the plants or, if it’s already as low as it can safely go, you may need a more powerful light.
- Symptom: Yellowing leaves, sometimes with brown, crispy spots.
Diagnosis: This could be ‘light burn’. The light is too intense or too close.
Solution: Raise the light a few inches. Remember to check the heat with the back of your hand; if it’s too warm for you, it’s too warm for the plant.
- Symptom: The edges of leaves are curling up.
Diagnosis: This is often a sign of heat stress, which goes hand-in-hand with the light being too close.
Solution: Raise the light and ensure there’s some gentle air movement in the room. A small fan can work wonders.
The key is to observe your plants daily. They will tell you what they need if you learn to read their signals. For more advanced diagnostics, consider checking out guides from established sources like the Royal Horticultural Society.
Getting your lighting right is the most important step towards a thriving indoor vertical garden. It takes a little trial and error, but once you find that sweet spot, you’ll be amazed at what you can grow.
Ready to choose your lights? See our Top 5 Grow Lights Review.
Sources
- Royal Horticultural Society – Grow Lights for Indoor Plants
- University of Cambridge – Department of Plant Sciences Research
- UK Agriculture and Horticulture Development Board (AHDB)
Note: The cooking times and temperatures provided are educational examples only. Always adjust based on your specific equipment and ingredients.
Frequently Asked Questions
Can I just use a regular bright lamp from my living room?
Ah, a great question! I get this one all the time. The short answer is, probably not. While a bright desk lamp might keep a very low-light plant alive for a while, it just doesn’t have the right ‘flavour’ of light—that crucial mix of red and blue wavelengths—that plants need for proper photosynthesis. Think of it as giving a child a bag of sugar for dinner. It’s energy, yes, but it’s not the right kind of energy for healthy growth. A proper full-spectrum grow light is designed to be a perfectly balanced meal.
How far away should my lights be from my plants?
This is the million-dollar question! It really depends on the power of your light. As a rule of thumb, I usually start with LED lights about 12-18 inches above the plant canopy. A more powerful light might need to be 24 inches away. The best thing to do is watch your plants. If they are stretching up, the light is too far. If you see white or yellow spots on the leaves, it’s probably too close. It’s a bit of a dance, but you’ll find the rhythm.
Do I really need to buy a timer?
Honestly? Yes. It’s the best tenner you’ll ever spend on your garden. Plants are creatures of habit and they rely on a consistent day/night cycle. Doing it manually is a recipe for disaster—you’ll forget, you’ll be out late, you’ll go on holiday. A simple timer takes all that stress away and gives your plants the consistency they crave. I wouldn’t run an indoor garden without one, simple as that.
Is it expensive to run LED grow lights?
It’s much cheaper than you might think! Modern LEDs are incredibly energy-efficient. A small light for an herb garden might use less electricity than your Wi-Fi router. While the initial cost of a good quality light can feel like a bit of an investment, the running costs are very low, especially compared to the older, hot-running purple lamps you used to see. You’ll barely notice it on your electricity bill, I promise.
How to Set Up Your Grow Lights for Success
- Choose Your Weapon (The Light!)
First things first, you need the right tool for the job. Based on what we’ve discussed, decide what you’re growing. Just some simple lettuce and herbs? A standard full-spectrum panel will be your best friend. Dreaming of indoor strawberries? You’ll need to invest in something a bit more powerful with good red-light output. Don’t be tempted by the cheapest option online; a good light from a reputable brand is an investment that pays for itself.
- Find the Sweet Spot (Height & Placement)
Now, let’s get it mounted. Most lights come with a hanging kit. Your goal is to centre the light over your growing area to provide the most even coverage possible. Start by hanging it at the manufacturer’s recommended height. This is your starting point, not the final position! You will be adjusting this as your plants grow, so make sure your hanging system is easy to change.
- Set the Schedule (Timers are Your Friend)
This is the easy bit. Take your new best friend, the timer, and plug your light into it. Then plug the timer into the wall. For most plants, I’d suggest starting with a 14-hour ‘on’ period and a 10-hour ‘off’ period. For example, you could set it to come on at 7 am and switch off at 9 pm. This gives them a lovely long day and a proper night’s rest. Set it, and forget it!
Bob is a UK-based teacher who brings his passion for simplifying complex topics to the world of small-space and container gardening. All his advice comes from years of hands-on experience, helping UK gardeners get the most out of their balconies and patios. You can read his full story on the About the Author page.