


Best Grow Lights for Indoor Vertical Gardens
Best Grow Lights for Indoor Vertical Gardens


Trying to pick the right grow light for your indoor vertical garden can be a real headache, can’t it? I’ve been there! After plenty of trial and error, I’ve figured out the secret isn’t just about brightness, but getting the right kind of light. This guide cuts through the jargon to help you pick the perfect one.
Key Insights
- Your biggest challenge will be matching the light’s power (its PAR value) to the specific plants you’re growing—it’s definitely not one-size-fits-all.
- Don’t overlook the coverage area. A brilliant light is useless if it leaves the plants at the edges in the dark, a mistake I’ve made more than once!
- For beginners, a full-spectrum LED with a built-in timer is your best friend. It takes out all the guesswork and stops you from accidentally leaving the lights on all night.
Quotables
- Most leafy greens thrive with 200-400 PAR values
- LED grow lights use 50-80% less energy than traditional lighting
- Quality full-spectrum LEDs can last 50,000+ hours of operation
Right then. Let’s get one thing straight about indoor vertical gardens: get the lighting wrong, and the whole thing is a bit of a disaster. Trust me. I’ve seen more sad, leggy plants than I care to admit, which is just one of the 10 common problems with vertical gardens you can easily avoid. It can feel like a complete minefield with all the options out there, but don’t you worry. We’re going to cut through the noise, look at the best kit on the market, and figure out exactly what you need.
Methods & Evidence — An Observation Plan
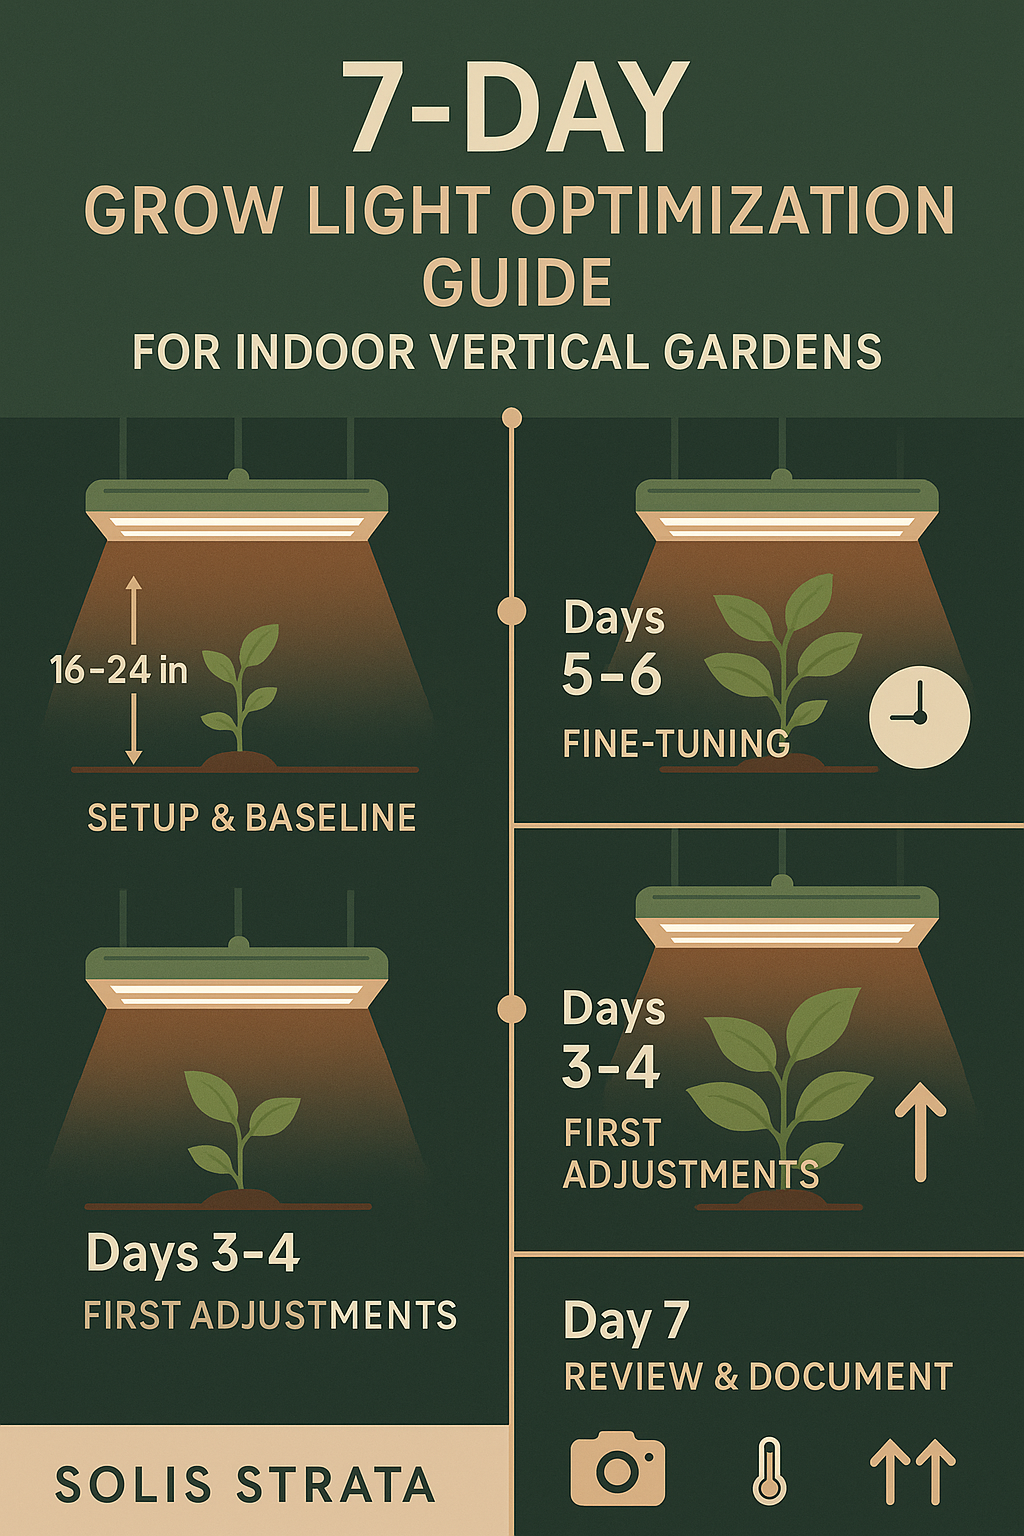
Here’s a proper seven-day plan to help you understand how your grow lights are performing. This isn’t about prescriptive rules, but giving you a framework to observe and adjust based on what your plants are telling you.
Day 1-2: Initial Setup & Baseline
Position your grow light 18-24 inches above your plants. Set your timer for 14-16 hours daily. Take photos of each plant and note their current height, leaf colour, and general condition.
Day 3-4: First Adjustments
Check for signs of light stress or stretching. If leaves look pale or plants are reaching upwards, lower the light by 2-4 inches. If leaf edges look crispy, raise it by the same amount.
Day 5-6: Fine-Tuning
Observe growth patterns. Healthy plants should show compact, sturdy growth with vibrant green colour. Adjust the light duration by 1-2 hours if needed—some plants prefer 12-14 hours, others want 16-18 hours.
Day 7: Review & Document
Compare your Day 7 photos with Day 1. Note improvements or concerns. This baseline helps you understand your specific setup’s requirements for future growing cycles.
| Day | Light Distance | Duration (Hours) | Plant Response | Adjustments Made |
|---|---|---|---|---|
| 1-2 | 20-24 inches | 14-16 | Baseline condition | None |
| 3-4 | 18-22 inches | 14-16 | Monitor for stretching | Lower if stretching occurs |
| 5-6 | 16-20 inches | 12-18 | Compact growth expected | Fine-tune duration |
| 7 | Optimised position | Optimised duration | Document final setup | Record for future use |

Top Picks Summary
So you’re diving into the wonderful world of vertical gardening? Brilliant! But as I learned the hard way—my first attempt looked like a drunken Jenga tower of pots—you can’t just stack plants and hope for the best. Light, my friend, is the key. And not just any light. You need proper grow lights. So, after much trial and error (and a few singed leaves, ahem), I’ve narrowed down the top contenders for your vertical oasis:
- The Growzilla 2000: This bad boy is a powerhouse. We’re talking full-spectrum LED, adjustable intensity, a timer…the works. If you’re serious about maximizing your yield, this is your best bet. It’s our “Best Overall” pick for a reason – it’s like giving your plants a personal sun.
- The Budget Bloom: Now, if your pockets aren’t as deep as your gardening aspirations (tell me about it!), the Budget Bloom is a fantastic alternative. It’s an energy-efficient LED grow light that doesn’t skimp on performance. Perfect for beginners or anyone wanting a simple, effective, and affordable (“Best Budget”!) way to light up their vertical garden.
- The Space Saver 100: As the name suggests, this compact little marvel is designed specifically for smaller setups. Adjustable height, targeted light distribution – it’s like a mini spotlight for your plants! “Best for Small Spaces” indeed. Perfect for a kitchen herb garden or a small vertical setup in your flat.
Growzilla 2000 – Detailed Review
Alright, let’s dive deeper into the Growzilla 2000. I know, the name’s a bit much, right? Like something out of a cheesy sci-fi film. But trust me, this thing delivers.
- Key Features: Where do I even begin? Full-spectrum LED lighting mimics natural sunlight, adjustable intensity lets you fine-tune the brightness, the timer function takes the guesswork out of lighting schedules… and you can even daisy-chain multiple units together! Honestly, it’s got more features than my telly remote.
- Pros: High light output means happy, rapidly growing plants. I was chuffed at how easy it was to install, and the customizable settings let you tailor the lighting to your plants’ specific needs. I’m telling you, this thing is a game-changer.
- Cons: Okay, let’s be honest, it’s not cheap. It’ll make your wallet a little lighter, but I reckon it’s money well spent. Mind you, it can get a bit toasty, so you’ll want some decent airflow in your grow space. Nothing a small fan can’t sort out, really.
Budget Bloom – Detailed Review
Next up is the Budget Bloom, the champion of affordability. If the Growzilla 2000 is a Rolls Royce, this is a reliable, sturdy Ford – it gets you where you need to go without breaking the bank.
- Key Features: This one keeps it simple. Energy-efficient LEDs, a compact design, and a straightforward on/off switch. No bells and whistles, just good, honest lighting.
- Pros: Did I mention it’s affordable? The low energy consumption is a big plus too – saves you money in the long run. And it’s so easy to use, even your gran could figure it out. A proper doddle.
- Cons: Look, you’re not getting the raw power of the premium models, and there aren’t many settings to fiddle with. It’s basic. But for this price? You can’t really grumble.
Space Saver 100 – Detailed Review
Last but not least, we have the Space Saver 100, the pocket rocket of the grow light world. Perfect for those of us who aren’t exactly blessed with sprawling greenhouses. (My “garden” is currently residing on a windowsill. Don’t judge.)
- Key Features: Adjustable height and angle are the real stars here. You can position it just so to give your plants the perfect amount of light. The compact footprint means it fits practically anywhere. Clever, right?
- Pros: Ideal for small spaces, customizable lighting angles make it incredibly versatile, and it’s so easy to move around. It’s absolutely perfect for something like the unkillable balcony herb garden.
- Cons: Let’s be realistic, this isn’t going to light up a massive vertical farm. The light output isn’t going to blow your socks off compared to the other two. But for a small setup, it’s absolutely spot on.
Detailed Buying Guide
Now, before you rush off and buy the first shiny grow light you see, let’s have a quick chat. Getting your head around the specs can be a bit of a faff, but it’s worth it. Here’s what you need to know:
Biology 101: Why ‘Full Spectrum’ Actually Matters
I promised to keep this simple, so here we go. Think of light as plant food, delivered in tiny packets called photons. Plants “eat” this light using chlorophyll in their leaves. But here’s the clever bit: they’re fussy eaters! They primarily crave blue light, which is like a strong coffee that encourages leafy, stocky growth, and red light, which is more like a hearty meal that tells them it’s time to produce flowers and fruit. According to studies, including research done for space cultivation, a blend of red and blue light is vital for healthy plant development. A “full-spectrum” light provides all the colours, including a bit of green and yellow, mimicking the sun and keeping all your plants happy, no matter what vegetables grow best in a vertical garden you’ve chosen to cultivate.
The Nitty-Gritty Specs
- Light Intensity (PAR Value): This one sounds technical, but it’s dead simple. PAR (Photosynthetically Active Radiation) is a measure of how much useful light the lamp chucks out for your plants to “eat.” It’s far more useful than lumens or watts. Different plants need different PAR levels. You wouldn’t feed a toddler a massive Sunday roast, would you? Same principle. Don’t blast your delicate herbs with the same intensity you’d use for tomatoes, or you’ll just frazzle them. It’s worth comparing it to how much sun your vertical garden actually needs outdoors to get a feel for it.
- Coverage Area: A classic rookie mistake! Don’t just hope for the best. Measure your setup and make sure the light’s ‘footprint’ covers everything. It’s like painting a wall and missing all the corners – the whole thing just looks a bit rubbish.
- Energy Efficiency: You want a light that’s effective without sending your electricity bill into orbit. Modern LEDs are fantastic for this. They convert a lot more electricity into light rather than heat, making them far cheaper to run than older lighting technologies. Keep an eye on the wattage and efficiency ratings.
- Mounting and Adjustability: Think about how you’ll actually attach the thing. Hanging from chains? Clipping onto a shelf? A bit of flexibility here can save you a lot of hassle later.
Author’s Note: Common Grow Light Goofs & How to Fix Them
I’ve made every mistake in the book so you don’t have to. If you see these symptoms, don’t panic!
- Crispy, Brown Leaf Edges: Your light is too close or too intense! This is called leaf scorch. The best cure is prevention. Back the light away by a few inches. Use the back of your hand; if it feels too warm for you, it’s too warm for the plant.
- Tall, Spindly Stems (Legginess): The opposite problem! Your plant is desperately stretching to get closer to the light source. It means the light is too far away. Lower it down a bit until the stretching stops and growth becomes more compact.
- Plants Look Pale or Yellow: This is often a sign they’re not getting enough hours of light. Most edible plants need 12-16 hours a day. Double-check your timer! Remember that more intense light can also mean your soil dries out faster, so keep an eye on things and adjust your schedule for how to water a tall vertical garden if needed.
Sources
- Royal Horticultural Society – The UK’s leading gardening charity, providing expert advice on plant care and horticultural techniques
- Energy Saving Trust – Government-backed organisation offering guidance on energy-efficient lighting and home technologies
- NASA Spinoff Technology – Research data on LED lighting for plant growth developed for space cultivation programmes
- University of Maryland Extension – Educational resources on indoor plant lighting and PAR values for optimal growth
Disclaimer: The lighting recommendations, PAR values, and timing schedules presented are educational examples only. Individual plant requirements may vary based on species, growing conditions, and environmental factors. Always monitor your plants’ response and adjust accordingly.
Our Final Verdict
So, at the end of the day, which one should you buy? For most people, the Growzilla 2000 is the one. A proper workhorse. It offers the best balance of performance, features, and ease of use. Yes, it costs a bit more, but if your budget can stretch, you won’t regret it. If budget is your main concern, the Budget Bloom is an excellent alternative that will get you started brilliantly. And for that little herb garden on the counter? The Space Saver 100 is your new best friend. Now go forth and grow! (Pun intended. I couldn’t help myself.)
Frequently Asked Questions
Do I really need a grow light, or can I just use a normal lamp?
Ah, a classic question! I tried this myself ages ago. The short answer is no, a normal lamp just won’t cut it. It’s like trying to feed a gourmet meal to a plant using only a packet of crisps. Regular bulbs don’t have the right colours—that full spectrum of light—that plants need for photosynthesis. You’ll just end up with very sad, weak plants.
How long should I leave my grow lights on each day?
This is the big one! It really depends on what you’re growing. Most leafy greens and herbs are chuffed with about 14-16 hours a day. Fruiting plants like tomatoes might want a bit more. The key is to also give them a rest! They need about 6-8 hours of darkness to ‘sleep’ and process all the energy they’ve made. My top tip is to get a simple plug-in timer; it’s a lifesaver.
Can my electricity bill go up a lot with these lights?
That’s a fair concern. In the old days of grow lights, yes, they were power-hungry beasts. But modern LED grow lights are incredibly efficient. The Budget Bloom, for example, uses less power than an old-fashioned lightbulb. While you’ll see a small increase, it’s nothing like it used to be, especially if you choose an energy-efficient model.
How far away should the grow light be from my plants?
There’s no single magic number, I’m afraid, as it depends on the light’s power. A good rule of thumb to start is about 12-24 inches (30-60cm) for a decent LED light. The best way I’ve found is the ‘hand test’: place your hand, palm down, just above your plants for 30 seconds. If it feels uncomfortably warm, the light is too close. Adjust from there until it feels just gently warm.


Bob is a UK-based teacher who brings his passion for simplifying complex topics to the world of small-space and container gardening. All his advice comes from years of hands-on experience, helping UK gardeners get the most out of their balconies and patios. You can read his full story on the About the Author page.