


Winterising a Vertical Garden in Cold Climates
If you’ve ever lost half your balcony jungle to an unexpected frost, believe me, I know that heartbreak. Winterising your vertical garden isn’t glamorous, but it’s the secret to keeping your green wall alive and thriving year after year. A bit of a faff, perhaps, but worth it, eh? In this guide, I’ll walk you through the exact steps I’ve learned (often the hard way) to get your plants safely tucked in for winter.
I remember my first attempt at a vertical garden. It was a vibrant, cascading wall of herbs and flowers – a little slice of summer paradise right on my balcony. Then winter hit. Let’s just say I learned a lot about the importance of winterising – the hard way. Proper knackered, my plants were! If you live in a colder climate and dream of year-round vertical gardening, or just want to ensure your precious plants survive the frost, this guide is for you. We’ll get stuck into practical, step-by-step strategies to prepare your vertical garden for the cold, so you can enjoy its beauty and bounty for years to come.
Snippet:
Whenever winter rolls around, I treat my vertical garden like family – checking what needs extra care, wrapping it up snug, and making sure the roots and structure don’t suffer in the frost. With a few clever tricks, I’ve learned how to keep it alive (and even thriving) right through the coldest months.
Quotables
- “Root zones stay happier at 2–5 °C above air temp with light insulation.”
- “Watering drops to roughly 25–40% of summer levels in deep winter.”
- “Windbreaks can cut exposure by 30–50%, saving tender edges from scorch.”
Key Insights
- Your biggest challenge will be working out what’s actually tough enough to survive – don’t waste effort trying to coax summer lovers through deep winter.
- Focus on insulation at the root and structure level – that’s where cold damage sneaks in.
- Watering less, but smarter, will save you from frozen soil and sad, drowned roots.
- A gradual spring revival makes all the difference – don’t shock your plants awake too quickly.
1. Assessing Your Vertical Garden’s Needs
Right, first things first. Before you even think about grabbing the bubble wrap (more on that later!), you need to play detective. What kind of winter are we dealing with here? A light dusting of snow or a full-on blizzard? Knowing your local climate is crucial. Check your average first and last frost dates – those are your bookends for the cold season. Also, look at average temperatures and snowfall. Trust me, your plants will thank you. It’s like checking the weather forecast before a picnic – you wouldn’t want to be caught in a proper downpour with your cucumber sandwiches, would you? Sound familiar?
Under the Hood – Plant Biology 101:
When frost hits, the water inside plant cells can actually freeze, expand, and burst those tiny cells. Imagine leaving a fizzy drink in the freezer – it expands and the can explodes. That’s basically what happens to tender plants in a cold snap. The tougher plants have a kind of natural antifreeze built into their sap, but others simply can’t cope. Honestly, knowing what’s in your garden is step one.
Next up, plant identification. Not all plants are created equal, you know. Some are tough as old boots, while others are delicate little snowflakes. You need to figure out which ones you’re dealing with. Check their hardiness zones – this tells you how much cold they can tolerate. If you’ve got a plant that’s happy in Zone 10, it’s not going to be thrilled overwintering in Zone 4. It’s like expecting a polar bear to sunbathe in the Sahara – just not going to happen. Barmy, right?
Finally, take a good look at your vertical garden structure. Is it flimsy? Sturdy? Made of wood, metal, plastic? Different materials react differently to the cold, and some might offer more natural insulation than others. If your structure is looking a bit rickety – like a drunken Jenga tower, perhaps – you might need to reinforce it before winter really sets in. Think of it as giving your garden a winter coat – a little extra protection goes a long way.
👉 If your vertical garden is attached to a balcony railing, you might also find it catches more wind than ground-level beds. In that case, you’ll definitely want to read my guide on protecting balcony gardens from strong winds.
2. Choosing the Right Plants for a Cold-Climate Vertical Garden
Right then, you’ve assessed your climate and structure – now for the fun part: choosing your plants! If you live in a colder climate, you can’t just throw any old plant into your vertical garden and hope for the best. Thing is, you need plants that laugh in the face of frost. Think cold-hardy perennials, evergreens, or even some winter vegetables. Kale, anyone?
The microclimate created by your vertical garden structure plays a role too. For instance, a south-facing wall will be warmer than a north-facing one. It’s like having a little sun trap, which can be great for extending the growing season. Mind you, it also means you might need to adjust your watering schedule accordingly. It’s a bit of a balancing act, but you’ll get the hang of it.
And here’s a little tip from a seasoned gardener (that’s me!): native plants are your friends. They’re adapted to your local climate, which means they’re already built to withstand the cold. Less fuss, less muss. Plus, they support local pollinators. It’s a win-win, really.
🌱 If you’re unsure what thrives in containers through winter, check out my rundown of what vegetables actually grow well in pots.
External resources worth peeking at:
- The Royal Horticultural Society (RHS) has brilliant guidance on frost-hardy plants.
- Gardening Know How has lots of practical advice for cold-weather veg.
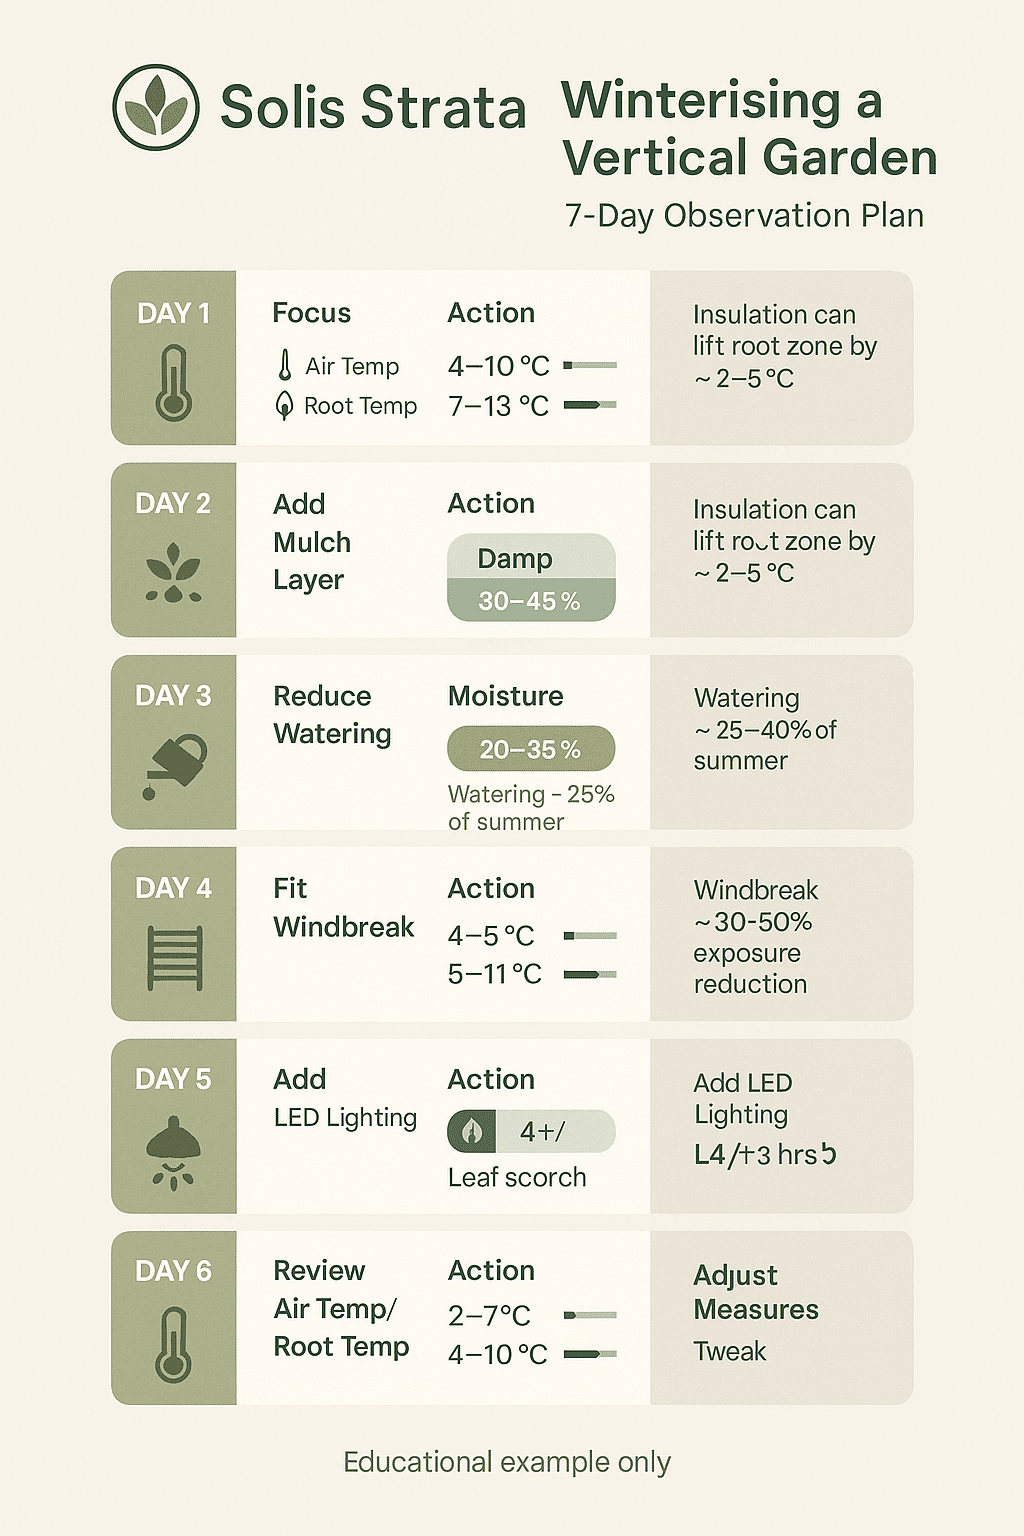
Methods & Evidence — An Observation Plan
Here’s a calm, seven-day observation plan I use with pupils and balcony gardeners alike. It’s not prescriptive; think of it as a rhythm to notice how your vertical garden responds to winter. Use ranges, keep notes, and adjust gently rather than making big swings.
- Day 1 – Baseline check: Record air temp (–3 to 6 °C), root-zone temp (0 to 8 °C), wind exposure, and plant list by hardiness.
- Day 2 – Insulation test: Add light mulch (2–5 cm) to a few pockets; compare root temps after 6–12 hours.
- Day 3 – Watering audit: Reduce irrigation to ~25–40% of summer volume; check moisture at 2–4 cm depth.
- Day 4 – Drainage & airflow: Confirm outlets are clear; add a simple windbreak reducing gusts by ~30–50%.
- Day 5 – Light review: If indoors/low light, trial LEDs 8–12 hours; observe leaf posture and colour.
- Day 6 – Stress signs: Note wilt, scorch, blackened tips; compare insulated vs. non-insulated pockets.
- Day 7 – Gentle tweaks: Adjust mulch (±1–2 cm), watering interval (±1–3 days), and light duration (±1–2 hours).
Illustrative Teaching Table
This example table mirrors the observation plan above. Values are illustrative to help you learn how to track winter responses in a vertical setup.
| Day | Focus | Action (range-based) | Air Temp (°C) | Root Temp (°C) | Moisture @2–4 cm |
|---|---|---|---|---|---|
| 1 | Baseline | Record temps, wind, plant hardiness | –2 to 5 | 0 to 7 | Damp 30–45% |
| 2 | Insulation | Add mulch 2–5 cm to test pockets | –3 to 4 | 2 to 8 | Damp 25–40% |
| 3 | Watering | Cut to 25–40% of summer | –1 to 6 | 1 to 6 | Moist 20–35% |
| 4 | Drainage/Wind | Clear outlets; add windbreak (30–50%) | –4 to 3 | 0 to 5 | Even 18–30% |
| 5 | Lighting | Trial LED 8–12 h | 0 to 7 | 2 to 7 | Even 18–28% |
| 6 | Stress check | Log scorch/wilt; compare pockets | –5 to 2 | 0 to 4 | Slight 15–25% |
| 7 | Tweak | Adjust mulch ±1–2 cm; watering ±1–3 days | –2 to 6 | 1 to 6 | Target 18–25% |

3. Insulating Your Vertical Garden for Winter
Right then, let’s talk insulation. Remember that winter coat we talked about earlier? This is where it comes in. Insulating your vertical garden is like tucking your plants into bed on a cold night – it keeps them cozy and protected from the elements. Burlap, frost blankets, and even good old bubble wrap are your best friends here. Just wrap them around your plants and structure to create a barrier against the cold. It’s not glamorous, I’ll admit, a bit of a faff even, but it works wonders.
For extra protection, you could build a simple frame around your vertical garden and cover it with plastic sheeting. This creates a mini-greenhouse effect, trapping heat and protecting your plants from wind and snow. It’s a bit like building a fort – fun and functional!
Don’t forget about the roots! They’re the unsung heroes of the plant world, and they need protection too. A thick layer of mulch around the base of your plants will insulate the soil and prevent the roots from freezing. Think of it as giving them little winter boots.
👉 Related read: How to stop soil falling out of planters – a handy hack if you’re adding thick mulch layers.
Expert Tip (learned the hard way!):
One year I wrapped my whole frame but forgot the drainage holes. Water collected, froze solid, and my poor thyme plant looked like it was stuck inside an ice lolly. Don’t make that mistake – always let the water escape.
4. Adjusting Your Watering Schedule for Winter
Right then, watering. This is where a lot of people go wrong. In winter, your plants need less water than in summer – sometimes significantly less. Overwatering can lead to root rot and other nasty problems. It’s a bit like overfeeding a goldfish – too much of a good thing can be harmful. Clever, right?
Good drainage is key. You want to make sure any excess water can drain away easily, so it doesn’t pool around the roots and freeze. Ice buildup can damage roots and make it harder for plants to absorb nutrients. It’s like trying to drink through a frozen straw – not ideal.
If you have an irrigation system, make sure it’s protected from freezing temperatures. You can drain the system, insulate exposed pipes, or use a heating cable to keep the water flowing. A burst pipe in the middle of winter is not something you want to deal with, trust me.
👉 If watering tall setups is your headache, you’ll want my walkthrough on watering tall vertical gardens.
5. Providing Supplemental Lighting for Winter Growth
Winter days are short and dark, which can be tough on plants. Supplemental lighting can give them the boost they need to survive and even thrive during the colder months. It’s like giving them a little dose of sunshine when the real thing is in short supply. Honestly, it makes all the difference.
Choosing the right grow lights can be a bit overwhelming. There are so many options! LED grow lights are a good choice – they’re energy-efficient and provide the right spectrum of light for plant growth. According to University of Minnesota Extension, LED full-spectrum lights are one of the best fits for home growers.
Placement is important too. You want the lights to be close enough to the plants to be effective, but not so close that they scorch the leaves. And you’ll need to experiment with the duration of light exposure. It’s a bit of trial and error, but you’ll find the sweet spot eventually.
👉 Handy resource: My guide to the best grow lights for vertical gardens.
6. Preparing Your Vertical Garden for Spring Revival
Spring is just around the corner! (Well, eventually…) Once the weather starts to warm up, it’s time to start thinking about reviving your vertical garden. But don’t just throw your plants out into the sunshine after a long winter indoors. They need to acclimate gradually, like a shy creature emerging from hibernation. Slowly increase their exposure to sunlight and warmer temperatures to avoid shocking them. You wouldn’t want to give them a fright, would you?
Next, a bit of a haircut. Prune any dead or damaged foliage to make way for new growth. It’s like spring cleaning for your garden.
Finally, replenish the nutrients in the soil. After a long winter, the soil can be depleted, so adding some compost or fertilizer will give your plants the boost they need to thrive. It’s like giving them a vitamin shot after a long illness. Now they’re ready to take on the world (or at least the growing season).
👉 If you want to kick-start things, have a peek at my breakdown of the top organic fertilisers for container veg.
Conclusion
At the end of the day, winterizing your vertical garden might seem daunting, but with a little planning and effort, you can ensure its survival and even enjoy some greenery throughout the colder months. From choosing the right plants to providing adequate insulation and light, these strategies will help you nurture your vertical oasis year after year. Right then, I’d love to hear from you: what are your favorite cold-hardy plants for your vertical garden? Share your tips and experiences in the comments below!
Sources
- Royal Horticultural Society (RHS)
- Met Office
- GOV.UK
- Royal Botanic Gardens, Kew
Disclaimer
This article is an educational example only. Use the ranges and methods to observe, then adapt to your site.
FAQs
How cold is too cold for my vertical garden?
Honestly, it depends on the plants. Hardy kale and evergreens shrug off frosts, but tender basil and tomatoes give up at the first nip of frost. I always check the plant’s hardiness zone – it’s like their personal winter rating.
Do I need to bring all my plants indoors?
Not necessarily! Some will be perfectly fine with mulch and insulation. I usually bring in my more delicate herbs and keep the tougher veg outside. It saves me space indoors too.
Can I still grow veg in winter?
Yes! Things like kale, spinach, and even winter lettuce can push through the cold. I’ve had fresh spinach leaves in January just from keeping them sheltered and mulched. It feels like such a treat.
How do I know if I’m overwatering in winter?
If the soil feels soggy days after watering, that’s your sign. I test with my finger – if it’s damp more than a couple of centimetres down, I hold off. Plants are sleepy in winter and drink far less.
What’s the best way to light a vertical garden indoors?
I’ve found LED full-spectrum grow lights work best – they’re efficient, safe, and mimic daylight. I set mine on a timer so the plants get 10–12 hours without me fussing. It’s like giving them their own alarm clock.
HowTo: Winterise Your Vertical Garden Like a Pro
Step 1 – Check your climate and plants
I always start by looking up local frost dates and making a list of which plants can survive outside. Anything tender gets earmarked for extra protection or a move indoors.
Step 2 – Reinforce and insulate
Next, I check the structure for wobbles and wrap it with burlap or plastic sheeting. Adding mulch feels like tucking everyone in with a blanket – roots especially love this.
Step 3 – Adjust watering
Once it’s cold, I cut watering right back. Plants are practically hibernating. I make sure excess water can drain away, otherwise it freezes and causes real damage.
Step 4 – Add light if needed
On my darkest winter balconies, I hang a couple of LED grow lights. It perks everything up and keeps growth steady when daylight fades.
Step 5 – Gentle spring revival
As soon as March sunlight arrives, I start peeling back covers and trimming away the old leaves. A bit of compost refreshes the soil, and slowly, the garden wakes up again.


Bob is a UK-based teacher who brings his passion for simplifying complex topics to the world of small-space and container gardening. All his advice comes from years of hands-on experience, helping UK gardeners get the most out of their balconies and patios. You can read his full story on the About the Author page.