What is the Best Way to Water a Tall Vertical Garden?
I remember the first time I built a tall vertical garden. A proper thing of beauty, it was—a vibrant green wall just bursting with herbs and flowers. But then came the watering. Oh, the watering. Hauling a can up a ladder every day? Not my idea of a good time, I can tell you. I quickly learned that these green towers need a bit of a different approach. So, in this guide, I’ll share everything I’ve learned the hard way, so you can skip the headaches and keep your plants properly hydrated. We’ll cover the lot, from choosing the right system to little tips for success.
Snippet
Watering a tall vertical garden can feel like a bit of a circus act at first – I’ve done the ladder-balancing routine, and trust me, it’s not fun. Over the years, I’ve settled on smart habits: drip irrigation with a timer, extendable wands, water-wise soil, and monthly maintenance checks. Here’s the cheat sheet I wish I’d had when I started.
Quotables
- A simple drip irrigation timer can save you 10-15 minutes of manual watering every single day.
- Top-tier planters in full sun can lose moisture 30-50% faster than their shaded neighbours at the bottom.
- A mature tomato plant in a vertical pocket might need between 1.5 and 2.5 litres of water on a hot summer’s day.
Key Insights
- Your biggest challenge will be getting water to the top without drowning the bottom—flow control is key.
- Focus on plant groups: thirsty Solanum lycopersicum (tomatoes) need more than drought-tolerant herbs.
- Drainage is destiny in vertical gardens—design it in, then test it before planting.
- Consistency beats heroics—steady, timed watering wins over occasional soakings.
1. Choosing the Right Watering System for Your Vertical Garden
Right, so you’ve built this magnificent vertical garden, a veritable green tower of Babylon. Looks fantastic, doesn’t it? But now comes the tricky bit: keeping the blighters watered. Trust me, lugging a watering can up a ladder every other day gets old fast. So, let’s talk watering systems. First, think about your garden’s structure. Is it plastered to a wall like a leafy limpet? Or is it a freestanding wonder, strutting its stuff in the middle of your patio? This impacts your watering options. Wall-mounted gardens might do well with a simple drip system tucked behind the plants, while freestanding ones offer more flexibility – you could even sneak a soaker hose around the base. If you’re still at the early planning stage, here’s my step-by-step on how to start a thriving balcony garden.
Right then, the methods themselves. Drip irrigation is like a tiny, personal IV drip for each plant – absolutely brilliant for targeted watering and it barely wastes a drop (RHS drip irrigation advice explains why it’s so efficient) (RHS). Soaker hoses, well, they soak. Great for coverage, but they can turn the bottom of your garden into a bit of a swamp. Manual watering with a can or hose? Perfectly fine, but a bit risky if you’re forgetful like me (crispy leaves, anyone?). And honestly, the most important bit is to consider your plants. Thirsty tomatoes simply won’t cope if they’re sharing a water line with hardy succulents. It’s like trying to share a single teacup between a marathon runner and a camel. More on that in my realist’s guide to growing tomatoes in pots.
Methods & Evidence — An Observation Plan
Every vertical garden is its own little ecosystem. Before you settle on a rigid watering schedule, spend a week getting to know its unique thirst. Think of yourself as a plant detective, gathering clues to crack the case of perfect hydration. Here’s a simple plan to follow.
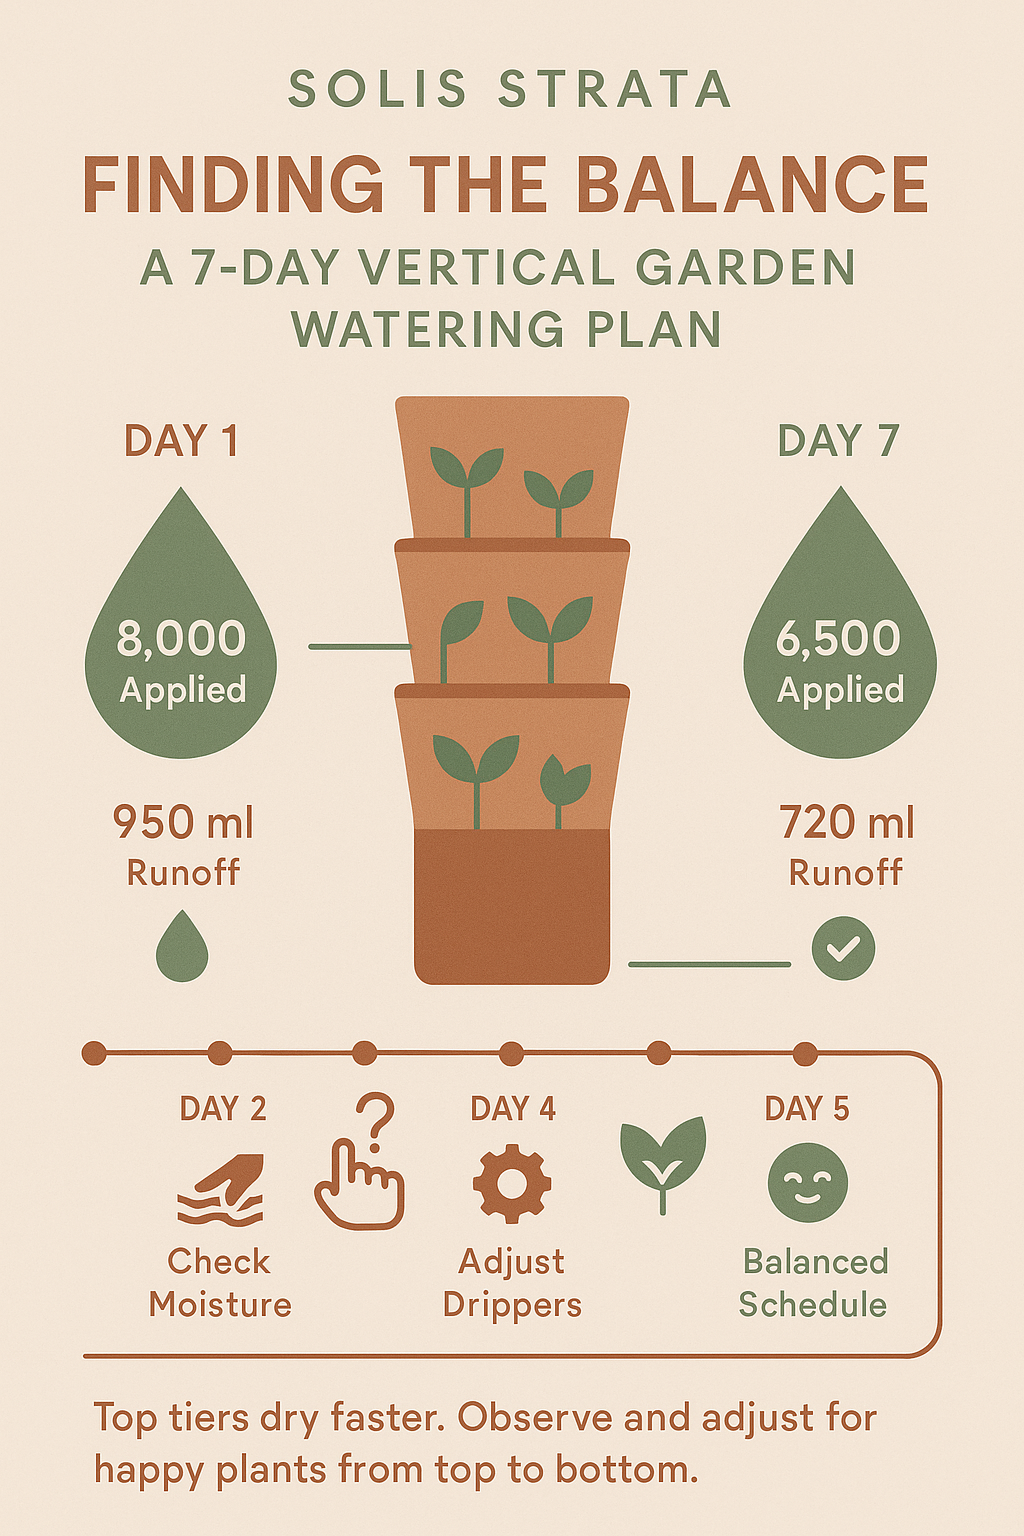
- Day 1: The Initial Soak. Give the entire wall a thorough but gentle watering until you see a small amount of drainage from the bottom pockets. Note the time and volume of water used. This sets your baseline.
- Day 2: Morning Check-in. Before watering, use your finger to check the soil moisture about 2-3 cm down in the top, middle, and bottom tiers. Is the top already feeling dry while the bottom is still damp? Make a note.
- Day 3: Measure the Runoff. Water as you normally would. Place a tray under the bottom tier to catch the runoff. You’re aiming for about 10-15% of the total water applied to drain through, ensuring everything is saturated but not waterlogged.
- Day 4: Mid-Week Tweak. Based on your notes, you might find the top needs a bit more and the bottom a bit less. If you’re using a drip system, this is a good time to adjust the flow rate of individual emitters.
- Day 5: Observe Plant Response. Look at the plants themselves. Are the leaves on top looking as perky as the ones at the bottom? Any wilting by late afternoon is a clear sign that tier needs more water.
- Day 6: Consistency Check. Repeat your watering routine and moisture checks. Are the results becoming more predictable? You should be getting a feel for how long the garden stays hydrated.
- Day 7: Establish a Schedule. Review your week of notes. You now have a solid, evidence-based starting point for your automated timer or manual routine. Remember to re-evaluate as the seasons change!
Illustrative Teaching Table
| Day | Tier | Soil Moisture (1=Dry, 5=Soggy) | Water Applied (ml) | Runoff (ml) | Observations |
|---|---|---|---|---|---|
| 1 | All | 2 | 8000 | 950 | Initial saturation. All tiers seem evenly moist. |
| 2 | Top | 2 | – | – | Top is drying out much faster than the bottom. |
| 2 | Bottom | 4 | – | – | Bottom is still quite damp from yesterday. |
| 3 | All | – | 6000 | 550 | Reduced water. Runoff is now about 9%. |
| 4 | Top | 3 | – | – | Adjusted top drippers to a higher flow rate. |
| 4 | Bottom | 4 | – | – | Adjusted bottom drippers to a lower flow rate. |
| 5 | All | – | 6500 | 700 | Better balance. Top plants look less stressed in the afternoon. |
| 6 | Top | 3 | – | – | Moisture levels feel more consistent across tiers now. |
| 7 | All | – | 6500 | 720 | Confident in this volume for a daily morning cycle. |
2. Setting Up a Drip Irrigation System for a Tall Vertical Garden
So, you’ve decided to go drip. Excellent choice! First things first, map out where your drippers will go, making sure every plant gets its own little watering soldier. Kit-wise, you’ll need the basics: tubing, emitters, connectors, and a timer. I’d also strongly recommend a pressure reducer—it’s the little gadget that stops you creating mini-fountains all over the patio. Emitters come in different flow rates, so you can match them to your plants’ needs, and the timer? Honestly, it’s a total lifesaver. Set and forget.
Getting it set up is straightforward enough. Attach the main tubing to an outdoor tap, clip it neatly up the frame, and then pop an emitter near the roots of each plant—using the little stakes helps keep it all tidy. Now, the common pitfalls? You’ll get uneven watering from kinks in the tube or rogue emitters going on strike, and sometimes clogs from grit or even a cheeky spider setting up home. A bit of regular cleaning usually sorts it right out. If you need practical step-by-steps, BBC Gardening’s watering basics cover the routine checks brilliantly (BBC Gardening).
Author’s Note: The first time I skipped the pressure reducer, I created an impromptu fountain that sprayed my neighbour’s laundry. Cue awkward wave and hasty hose shut-off. Don’t be me—test first!
3. Mastering the Art of Manual Watering for Tall Vertical Gardens
Right, manual watering. A bit old-school, perhaps, but it still works a treat if you’ve got the time. My top tip? Invest in an extendable watering wand. Your back will thank you, and you won’t be risking any circus tricks on a wobbly ladder. The whole game with vertical gardens is balance. Too little water and you get sad, floppy leaves; too much and you create a swamp at the base. Just keep an eye out for the tell-tale signs: yellowing leaves, soggy soil, or just generally sulky-looking growth.
Honestly, drainage is everything. I once forgot to add enough holes and ended up with a proper bog under my herbs—they were not impressed. The lesson is simple: drill, test, and check before you plant. If you’re worried about losing soil while adding extra drainage, here’s how I solved it in how to stop soil falling out of planters.
3.5 Under the Hood: How Water Moves in a Vertical Garden
Time for a quick “biology 101.” Water is pulled down by gravity, of course, but it also spreads sideways thanks to capillary action—think of tea climbing up a sugar cube. It’s the same principle. This means the top tiers dry out fastest from sun and wind, while the bottom pockets risk staying a bit soggy. The big danger is if your compost dries out completely. It can become hydrophobic, which is just a fancy way of saying it repels water. The water just shoots straight through like it’s sliding down a chute, ignoring the thirsty roots. The fix? Gently poke a few holes into the mix with a pencil, water very slowly, and let it re-absorb. You’ll be amazed; within an hour, the leaves should perk up and look far less sulky.
4. Optimising Water Efficiency in Your Vertical Garden
Let’s be honest, no one wants to waste water or money. An easy win is to add spongy materials like coconut coir, composted bark, or even water-retaining crystals to your soil mix to hold onto moisture for longer (University Extension research explains how amendments work) (University of Florida Extension). After that, mulch! Think of it as a cosy duvet for your soil; it dramatically reduces evaporation, especially on windy days (RHS mulching tips are excellent) (RHS).
Rainwater harvesting is another gem. A slimline barrel under your downpipe can cover much of summer watering. Just keep it lidded to avoid breeding mozzies. For extra household tips, check GOV.UK’s water-saving advice (GOV.UK). Want a mix that balances water retention and drainage? My go-to recipe is in best soil mix for vertical container gardening.
5. Troubleshooting Common Watering Problems in Tall Vertical Gardens
Leaks, clogs, uneven watering—believe me, I’ve been there. You’ll know you have a leak when you see puddles, a clog when one emitter looks sulky while its neighbours are fine, and uneven flow is usually down to a kinked hose. Seeing plants that look pale or stunted? That could be a sign that all that water is washing the nutrients right out of the soil. The key is to fix leaks fast, flush your lines regularly, and adjust timers as needed. And if you spot a white, salty crust on the soil surface? That’s fertiliser build-up. Just run a longer flush with plain water to clear it out.
Mind you, it’s a balancing act. Overwatering invites pests and mildew, while underwatering weakens plants, making them an easy target for bugs. It’s a classic catch-22. If you’d like a bigger checklist, I’ve pulled together 10 common problems with vertical gardens that’ll help you play plant detective.
6. Maintaining Your Watering System for Long-Term Success
At the end of the day, think of your watering kit like a car—it needs a monthly MOT. Just a quick check-up: flush the lines, swap out any dodgy-looking emitters, and make sure the timer is still doing what it’s told. At the end of the season? Drain everything, give it a clean, and store it somewhere dry. I know, it’s a bit of a faff, but it’s so worth it come spring. And don’t forget the plants themselves! As they grow, their watering needs will shift. Seedlings need gentle, frequent sips, while mature plants want deeper, slower drinks. Adjust as you go—that’s all part of the fun.
Conclusion
So there you have it. Watering a tall vertical garden really doesn’t have to be a nightmare. It’s all about choosing the right system for you, keeping a close eye on what your plants are telling you, and being ready to tweak things as the seasons change. Stick with it, and I promise you’ll have a thriving, green wall that’s more joy than chore. Now, over to you—what tricks have you discovered along the way? Drop your tips in the comments below, I’d love to hear them.
Sources
- Royal Horticultural Society (RHS). Advice on drip irrigation systems and mulching.
- BBC Gardening. Guidance on general watering techniques and maintenance.
- GOV.UK. Official information on water conservation and rainwater harvesting in the UK.
Disclaimer
Just a quick note: the data in the table and the schedules mentioned are illustrative examples from my own experience. Every garden is a unique little world, so use this as a starting point and adapt it to your own plants, climate, and setup. Happy gardening!
FAQs
How often should I water a tall vertical garden?
Thing is, there’s no universal rule. I check each morning—if the soil feels dry an inch down, water it. In summer heat, daily with a timer; in cooler weeks, every other day works.
What’s the best time of day to water?
Always early morning. Plants drink through the day and leaves dry quickly, reducing mildew risk. Evening is a backup but avoid wetting leaves overnight.
Can I use greywater?
Yes, but cautiously. I reuse cooled veg rinse water, never soapy or chemical water. Plants aren’t fond of detergents. If in doubt, rainwater is safer.
How do I stop leaks out the back?
Slow down watering—use low-flow emitters, add fibrous compost, and water gently. Check pocket linings and backboards for gaps too.
Do I need fertiliser in the system?
Yes. I add a weak liquid feed via the drip line every fortnight in peak growth. Always flush with plain water to prevent salt build-up.
HowTo: Set Up a Simple Drip System
Step 1: Plan Your Layout
Sketch plant positions. Group thirsty ones like tomatoes together, succulents apart.
Step 2: Gather Your Kit
Tubing, emitters, stakes, connectors, pressure reducer, timer. A starter kit keeps it simple.
Step 3: Connect to Tap
Attach reducer and tubing, clip it neatly up the frame—future you will thank you.
Step 4: Place Emitters
Stake each emitter near a root zone. Choose higher flow for veg, lower for herbs.
Step 5: Test and Adjust
Run it for 5 minutes. Fix kinks, leaks, or dry patches before final tidy-up.
Step 6: Automate Lightly
Program short, regular cycles. Adjust with the seasons. Consistency is key.
Bob is a UK-based teacher who brings his passion for simplifying complex topics to the world of small-space and container gardening. All his advice comes from years of hands-on experience, helping UK gardeners get the most out of their balconies and patios. You can read his full story on the About the Author page.